
The tutorial, step by step
Every step of the new-player tutorial on DWO Reborn: two guided battles, your first temper, choosing your general, your promotion and the Beautician.
- A girl called the Melee Receptionist guides you through two short practice battles.
- In between you upgrade your weapon at the Blacksmith and choose a general to serve.
- Finishing it promotes you, gives you an outfit and opens battles against players.
Tap an underlined word to see what it means.
The tutorial is a short chain of guided steps led by a cheerful girl, the Melee Receptionist. It takes about half an hour, pays your first gold, teaches the controls, and ends with a promotion and a free outfit. Do every step; the battle grounds stay locked until you finish it.
Many English videos of a Dynasty Warriors Online tutorial show the original 2010 service (an Instructor in a walled yard). DWO Reborn is rebuilt from the later Japanese version of the game, so the steps below are the ones you will actually see.
Step 1: wake up and head outside
You start in your house. The Melee Receptionist is waiting: she introduces herself and says she will wait for you outside. Walk out through the exit door with W, A, S and D. Outside she says it is time to study the basics of combat, and the battle preparation screen opens. Press Ready.
Step 2: First Battle (the combat drills)
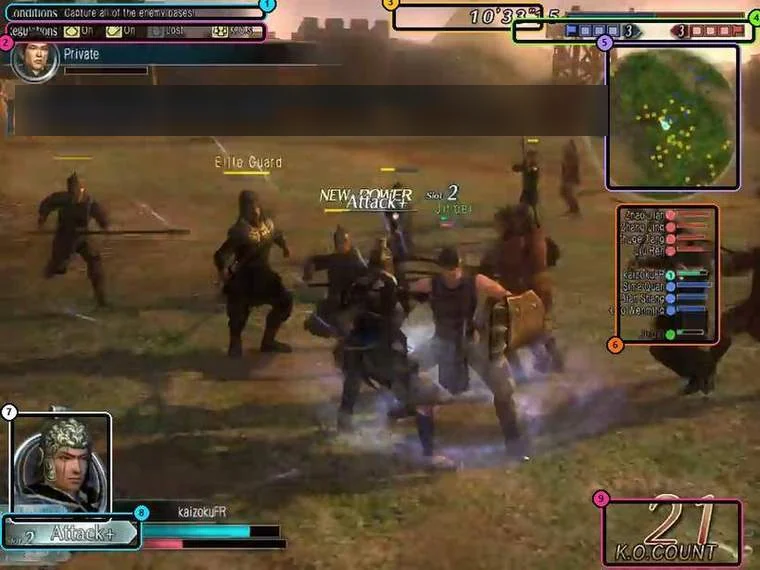
A short practice battle with an 8 minute clock. The objectives appear at the top left of the screen:
- Move to your lord, shown on the map.
- Enemy soldiers appear: defeat every last one.
- The Training Officer drills you: a normal attack, then Charge Attacks 1 to 4. Each drill only passes when you do exactly that move, and there is no time limit.
- More enemies arrive, and you are shown the Musou gauge (the red bar at the bottom left). Fill it and press L.
- Special mission complete.
| Drill | Keys |
|---|---|
| Normal attack | J |
| Charge Attack 1 | K |
| Charge Attack 2 | J, K |
| Charge Attack 3 | J, J, K |
| Charge Attack 4 | J, J, J, K |
| Musou | L (when the red gauge is full) |
If you lose, you simply try again. Back in your house a reward card shows what you earned:
| Reward | Amount |
|---|---|
| Gold | 2,000 |
| Honor | 3 |
| Tortoise Amulet | 1 |
| Ruby, Jade, Lapis, Topaz and Amber gems | 3 of each |
| Domestic skills | +5 each |
The reward card also shows a large Internal Affairs number for your faction. That is the whole faction's total, not yours, so do not worry about it.
Step 3: your first temper at the Blacksmith
The Receptionist tells you that weapons must be tempered to grow stronger, and sends you to the Blacksmith in the Market. Leave the house; a pulsing ring marks him on the map.
- Click the Blacksmith and choose Temper.
- Pick your Rank 4 Spear (it shows Temper 0/24) and temper it once. It costs 30 gold and uses your gems.
- A flashing message tells you to report to the Melee Receptionist beside the Blacksmith. Talk to her.
Step 4: choose the general you serve
Next the Receptionist sends you to enlist with a general, gives you a letter of introduction, and moves you to the Courtyard: a ring of office doors, each with a guard named after his general.
- Walk into any office whose door is open (locked offices belong to generals your faction has not recruited).
- Talk to the general. His card appears at the bottom left with his bonuses.
- Choose Serve (his name) to join him, or Seek another general to look further.
When you serve a general you also receive the Musou Board, a stamp card you fill by checking in with the general on duty (Main menu, Information, Personal, Musou Board). Your general adds a +10 bonus to one of your domestic skills, which shows on your Character Information.
Choose the general you like; the bonuses are small. You can serve another general later by talking to him in the Courtyard.
Step 5: the bandit battle (flasks and bases)
Bandits have been stealing the town's food. This second battle (15 minute clock) teaches the flask system and bases, with the Receptionist guiding you:
- Let's enhance: soldiers drop flasks when defeated. Pick them up and press I to spend them on the enhancement ring.
- Gather lots of enemies and defeat them all at once. She counts your defeats up to 100.
- Along the way she shows you the bases: red ones are the enemy's, and when you capture one you can come back to life there. Towers need the Damage enhancement to break.
- At 100 defeats a strong enemy appears: defeat the Bandit Leader.
- Quest Complete.
Step 6: promotion and a free outfit
Back in the Courtyard the Receptionist promotes you from Recruit to Guard and hands over clothing. You receive:
| Reward | Amount |
|---|---|
| Rank | Recruit to Guard |
| Honor | 200 |
| Gear | The Dark Hero +7 outfit (4 pieces) |
| Tortoise Amulet | 1 |
| Domestic skills | Topped up to +20 each in total |
Close the reward card before you open your Equipment window to put the outfit on.
Step 7: report to the Melee Receptionist
Leave through the exit. The Melee Receptionist blinks on the map and the top-left of the screen tells you to check her quest. Click her and choose Quest in her menu to finish the battle chapter of the tutorial. She is also the one who books Quick Melee matches from now on.
Step 8: the Beautician
Finally you are taken to the Market in front of the Beautician. Talk to the customer standing beside her: she explains Beauty (changing your looks) and Touch-up (going back to your previous look). Then try it yourself by talking to the Beautician and choosing Beauty.
The Beautician step is new on DWO Reborn and may still change; follow the on-screen prompts.
After the tutorial
- PvP is now open: the tutorial makes you a Guard, and PvP needs the tutorial finished.
- Your house door now leads to your capital's Central Plaza. Use Set on the door to choose a different default plaza.
- Wear your Dark Hero outfit and equip the Tortoise Amulet as a battle item if you like.
- Take your first Musou Board stamp from the general on duty.
Crashed or logged out in the middle of the tutorial? Log back in: the current step starts again when you arrive in your house, and a battle that already ended keeps its result.