
Flask upgrades: the enhancement ring
Flasks are the power-ups you collect during a battle. How to collect them, how the seven-slot ring works, what each enhancement does, Advance+, and a simple plan for spending them.
- Enemies drop flasks: small gourds that power you up for the rest of the battle.
- Each flask moves a counter on the ring; press I when it reaches the upgrade you want.
- The battle's Retreat Power-up rule decides what you lose when you are defeated.
Tap an underlined word to see what it means.
Flasks (the game's Japanese word is sentan) are small gourds that defeated enemies leave on the ground. They only exist inside one battle: you collect them, spend them on the enhancement ring to power up, and lose whatever you have not spent when the battle ends. Understanding the ring is the single biggest step from beginner to competent player.
Collecting flasks
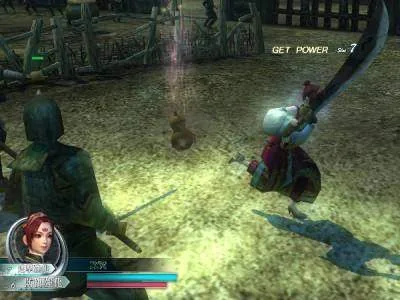
- Walk over a flask to pick it up. GET POWER flashes with the slot number your counter has reached.
- A flask does nothing by itself. It only moves your counter forward; you spend the counter with the Flask Upgrade key, I.
- Everyone in the battle sees the same flasks. The first player to touch one takes it.
- When a player who has flask upgrades is defeated in PvP, a flask drops that only their opponents can pick up.
Soldiers come in packs: one Major (or a sorcerer) in the middle and four Privates around him. Only the leader drops anything: usually a flask, sometimes a meat bun. Privates, archers and soldiers guarding a base drop nothing, and nothing drops from soldiers defeated inside a base. A pack comes back a while after its leader falls.
The flask appears when the defeated soldier's body disappears, not the moment he falls; this stops you grabbing one by accident in a fight. Wait a second, then walk over the spot.
The ring, step by step
The ring sits in the bottom-left corner under your portrait. It shows your counter (Slot 1 to 7), the name of the enhancement in that slot, and its stars.
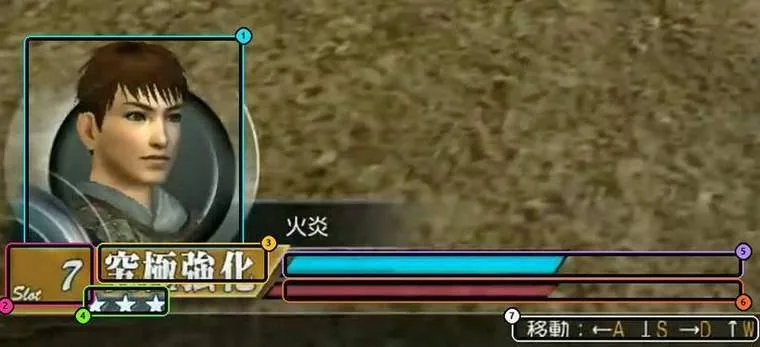
- Every flask you pick up moves the counter forward by one. The counter number is the slot you are pointing at.
- When the counter reaches the slot you want, press I.
- The enhancement fires: its name appears above your head, a message confirms it, and one of that slot's stars lights up.
- The counter goes back to zero. A slot always costs its own number in flasks: slot 1 costs 1 flask, slot 7 costs 7.
On slots 1 to 6 you can overshoot: one extra flask moves you past the slot you wanted. Stop picking up flasks when you reach your slot and press I. The counter stops at 7 and never wraps around; flasks picked up while you sit at 7 are wasted.
Stars
A slot's stars are how many times you can fire it in this battle. The five stat slots get 0 to 5 stars each, and you earn them by tempering your weapon at the Blacksmith. Lieutenant+ and Combo+ always have 3. When every star is lit the slot is used up and its name greys out.
A stat slot with no stars is not locked: it becomes a random slot (shown as four question marks). See Random slots below. A brand-new weapon with Temper 0 has random slots everywhere until you temper it.
The seven slots
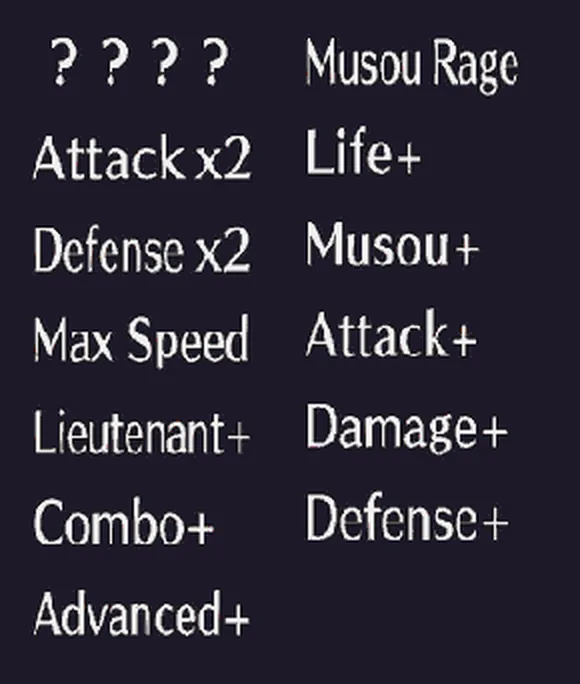
Every weapon has the same seven slots, but the five stats sit in a different order on each weapon. Slot 4 is always Lieutenant+ and slot 7 is always Combo+.
Example: the ring of the starter Spear.
Tap a slot to see what it does.
Slot 1: Musou+
A bigger Musou gauge that fills faster. Costs 1 flask on this weapon.
Slot 2: Attack+
More damage to people for the rest of the battle. Costs 2 flasks: buy it first.
Slot 3: Damage+
Breaks towers, gates and other objects much faster. Costs 3 flasks.
Slot 4: Lieutenant+
Lieutenants do not fight in battles yet, so this slot gives a random short buff for 4 flasks, as often as you like.
Slot 5: Defense+
Less damage taken. Costs 5 flasks.
Slot 6: Life+
More maximum Life, and heals you by the same amount. Costs 6 flasks.
Slot 7: Combo+
Longer attack strings (C5, then C6, then Evolution attacks). After three uses this slot becomes Advance+, your weapon's special ability.
| Ring label | Slot | Uses | What it does |
|---|---|---|---|
| Attack+ | Depends on the weapon | 0-5 stars | More damage to people (players, officers and soldiers) for the rest of the battle. |
| Damage+ | Depends on the weapon | 0-5 stars | More damage to objects: towers, gates, fences, catapults, cauldrons and other structures. Some bases cannot be taken without it. |
| Defense+ | Depends on the weapon | 0-5 stars | Less damage taken. |
| Life+ | Depends on the weapon | 0-5 stars | Raises your maximum Life and your current Life by the same amount, so it doubles as an emergency heal. |
| Musou+ | Depends on the weapon | 0-5 stars | A bigger Musou gauge that fills faster. |
| Lieutenant+ | 4 | 3 | In the original game, adds your lieutenant's skills to your Musou. On DWO Reborn it gives a random buff (see below). |
| Combo+ | 7 | 3 | 1st use: N5 and C5. 2nd use: N6 and C6. 3rd use: Evolution attacks, and slot 7 becomes Advance+. |
Each stat use adds a fixed amount, shown in brackets on your weapon card, for example Attack 46 (+20). Because stats bought early help for the whole battle, buy them early.
Damage is not damage to people. If your team has to break towers or gates, someone needs Damage+.
Reading your weapon's ring before battle
Open the main menu, then Information, Personal, Weapon. Each stat line shows its starting value, the amount one use adds in brackets, a row of stars (how many uses you have), and Slot N, which is both the slot and how many flasks one use costs. The Ultimate Enhancement line names your weapon's Advance+.
Every weapon page on this wiki shows the same thing: Base Stats prints each value with its slot in brackets, for example Attack 46(2), and the Flask Wheel section shows the slot of each stat. The smaller the number, the cheaper that stat is to buy.
| Example: the starter Spear family | Slot |
|---|---|
| Musou+ | 1 |
| Attack+ | 2 |
| Damage+ | 3 |
| Lieutenant+ (random buff on DWO Reborn) | 4 |
| Defense+ | 5 |
| Life+ | 6 |
| Combo+, then Advance+ (Reach: attack range x2) | 7 |
Random slots
A stat slot with no stars shows four question marks. Firing it gives one of three short buffs, and the star is not used up, so you can fire it again:
| Buff | Glow | Effect |
|---|---|---|
| Attack x2 | Red | Double attack. |
| Defense x2 | Green | Double defence. |
| Max Speed | Blue | Top running speed. |
The buff lasts 5 seconds per slot number: 5 seconds on slot 1, up to 30 seconds on slot 6. Different buffs can run together; the same buff adds time up to 50 seconds. Crates on the battlefield can hold the same three buffs for 15 seconds each.
Lieutenants do not fight in battles on DWO Reborn yet. Until they do, slot 4 works as a random slot: four flasks buy a 20 second buff, and the slot can be fired again and again. The ring still says Lieutenant+.
Combo+ and Advance+
Three uses of Combo+ cost 21 flasks in total (7 each). After the third, slot 7 changes into your weapon's Advance+ (the Ultimate Enhancement; the ring art says Advanced+). From then on every 7 flasks fire it:
- It lasts 30 seconds, shown by a yellow bar above your Life bar and a white glow.
- It can be used any number of times. Firing it again while it runs adds time, up to 50 seconds, so fire the next one when 20 seconds or less are left.
- It does not need a full Musou gauge (only Evolution attacks do).
- Which ability you get is fixed by your weapon. Check the weapon card or the weapon's wiki page.
Some Advance+ abilities on DWO Reborn
| Ability | What it does on DWO Reborn |
|---|---|
| Reach | Doubles the width of your attacks (the starter Spear's Advance+). |
| Toughness | Doubles your maximum and current Life. |
| Dragon Soul | Attack and Damage x1.5. |
| Gravity | Attack rises the more Life you have lost, up to double. |
| Drain Guard | Each blow you guard drains some of the attacker's Musou. |
| Venom | Your hits poison enemy players for a while: weaker attack and defence, and their Life drains. |
| Shatter | Break Charge costs half the Musou and does double damage. |
| Sacrifice | You slowly lose Life (never below 1) and weaken yourself, while every team-mate slowly heals and gets stronger. |
| Protect | Every team-mate slowly regenerates Life (not you). |
| Leech | Heals you for part of the damage you deal to enemy players. |
| Armor Break | Enemies you hit lose much of their defence for a short time. |
| Wither | Nobody in the battle gains any Musou while it runs. |
Switching weapons with Break Charge keeps your counter, but cuts a running Advance+ short, and Advance+ cannot be fired during the Break Charge itself. Your second weapon has its own Advance+.
Retreat Power-up: what a defeat costs you
When you are defeated (the game says you retreat), what happens to your flask upgrades is decided by the battle's Retreat Power-up rule. It is one of the battle conditions: read it in Battle Preparations and on the conditions panel at the top left of the battle screen before you start spending.
| Retreat Power-up | You start the battle | When you retreat |
|---|---|---|
| Maintain | With no upgrades lit | You keep your flask upgrades. |
| Decrease | With no upgrades lit | You lose one of your flask upgrades. |
| Lost | With no upgrades lit | You lose all of your flask upgrades and start again from zero. |
| Enhanced Status Maintained | Fully powered: every star your weapon has is already lit | As Maintain. |
| Enhanced Status Decreased | Fully powered | As Decrease. |
- Timed buffs (Attack x2, Defense x2, Max Speed) and a running Advance+ always end when you retreat.
- Quests have their own rule too; check the quest's conditions panel. In the tutorial's battles a retreat wipes your upgrades, as the Melee Receptionist warns.
- Quick Melee, Quick Mock, Standoff and Deadlock, and every battle on the Arena, start you fully powered.
- When the battle ends, everything is gone: flasks never leave a battle.
Under Lost, a defeat late in the battle can throw away twenty minutes of work: buy Defense+ earlier, and back off rather than trade blows when you are heavily upgraded. Under Maintain you can afford to be bold.
Switching weapons
A Break Charge to your second weapon keeps your flask counter, but cuts a running Advance+ short.
Items can give you a head start: a Large Flask starts the counter at 3, a Storage Flask at 5, and Ginseng starts Combo+ at 1. A Time Scroll adds 5 seconds to buffs and Advance+. All are sold by the Merchant.
A simple flask plan for beginners
- Before the battle, look at your weapon card: note the slot of Attack, Defense and Damage, how many stars each has, and your Advance+.
- If you start bare, farm first: run through open ground, defeat the leader in the middle of each pack, and wait for the flask to appear.
- Buy Attack+ first, whatever slot it is in, then Defense+. Stats bought early count for the whole battle.
- Buy Damage+ before you attack a base with towers or gates.
- Then save for Combo+ three times (21 flasks). Under Maintain or Decrease commit early; under Lost, make sure you can survive long enough to use it.
- After that, fire Advance+ every 7 flasks, and use slot 4 for a free 20 second buff whenever you are about to fight.
- Keep Life+ for emergencies: at low Life it works as a heal.
- Late in the battle, stop buying permanent stats and spend everything on Advance+ and buffs.
Reading other players
- Stars under a player's bar on the right of the screen show how many enhancements they have fired (a number from 5 up), not which ones.
- A red, green or blue glow is a random buff; a white glow is Advance+. Back off for a few seconds rather than trading blows.
- GET POWER over another player means they just picked up a flask, and the slot shows where their counter is.
Check yourself
1. Your counter shows 3. Which slot does pressing I use?
The counter number is the slot you are pointing at.
2. How many flasks does slot 5 cost?
A slot always costs its own number in flasks.
3. In a room set to Lost, what happens to your flask upgrades when you are defeated?
Maintain keeps them, Decrease loses one, Lost loses all.
4. What does Damage+ improve?
Damage breaks objects; Attack hurts people.