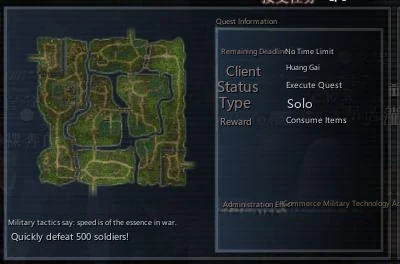
Rewards by Rank
| S Rank | A Rank | B Rank | C Rank | D Rank | E Rank |
|---|
| Quest Reward | Wind Thunder Talisman x1 Extreme Vermillion Bird Wing Military Funds 250 | Wind Thunder Talisman x2 | Wind Thunder Talisman | 400 Military Funds | Military Funds 300 | Military Funds 200 |
Walkthrough
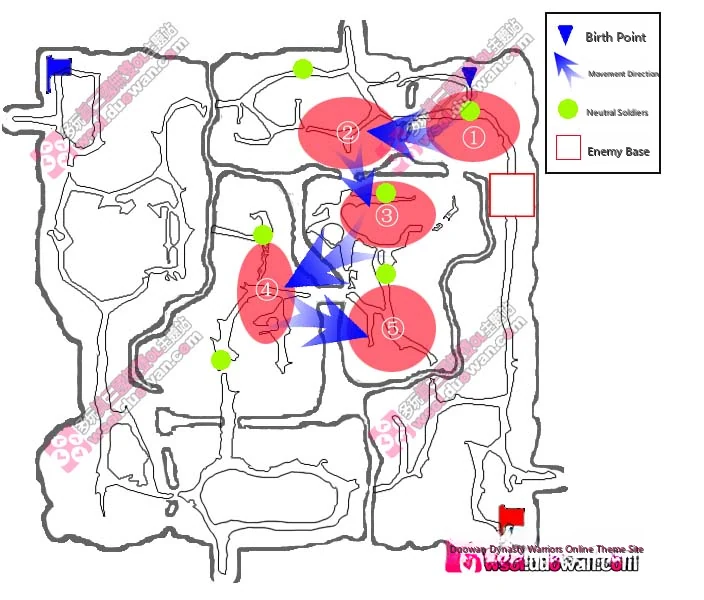
At spawn, location ① refreshes 100 enemy soldiers
After defeating 150 people, all enemy soldiers at location ① disappear, and 100 archers spawn at location ②
After defeating 200 enemies, all archers at location ② disappear, 100 enemy soldiers spawn at location ③
After defeating 300 enemies, all enemy soldiers at location ③ disappear, 100 archers spawn at location ④
After defeating 350 people, all archers at location ④ disappear, and 100 enemy soldiers spawn at location ⑤
Since only a small number of neutral soldiers can be found except at spawn points, you must travel between several spawn locations. Time is very tight. Especially when archers spawn, it's troublesome because archers don't move, are scattered in position, and are very difficult to defeat.
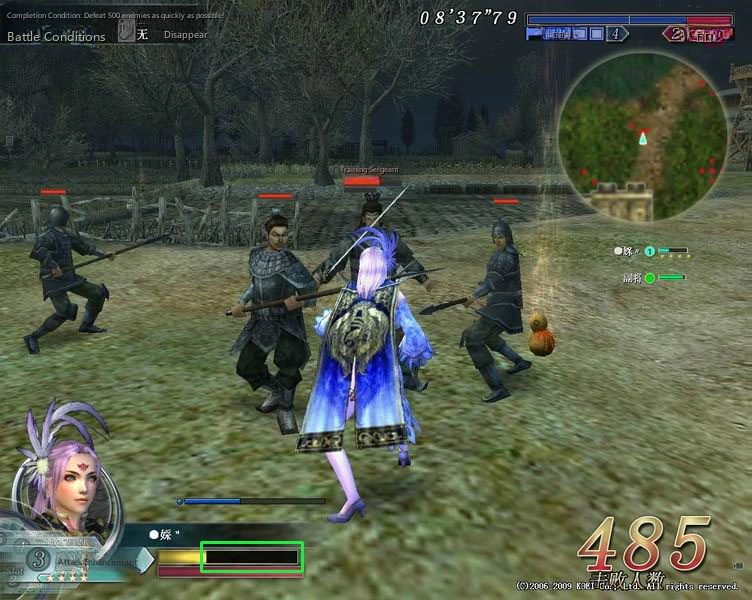
During the 5th wave spawn, which is the final wave, Training Squad Leaders will appear. Their attack power is very high - if you get hit twice by them, it's over. You must be very careful.
The green frame area shows an unenhanced defense Twin Swords taking one hit from a Training Squad LeaderCharge Skill C1blood loss afterwards.
S Rank Achievement Notes
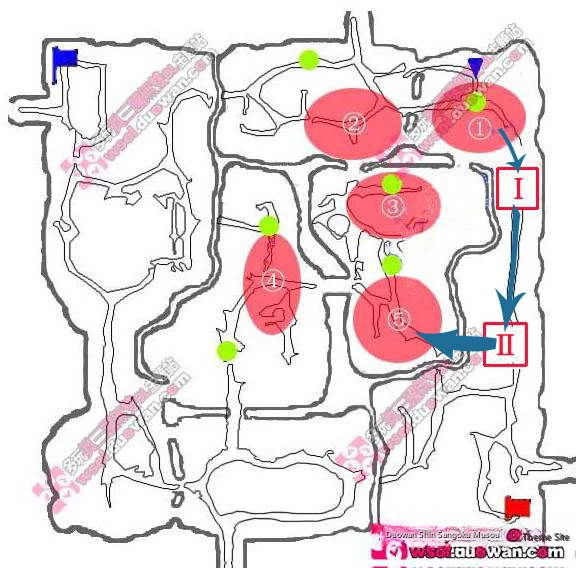
To achieve S rank for this quest requires technique. The route also needs to be changed, as shown above. Because the archers are scattered and hard to kill, and you have to run much more, wasting a lot of time. So the first key to S rank strategy is toavoid killing archers.
First, the first wave has 150 soldiers, and the fifth wave spawns when 350 are defeated. The problem we need to solve is getting the middle 200 defeats faster. Other areas of the map don't spawn soldiers, so we can focus on the two soldier bases on the right. Each soldier base has 100 soldiers, taking down both bases gives us exactly the middle 200 defeats to reach 350 total defeats, spawning the final wave.
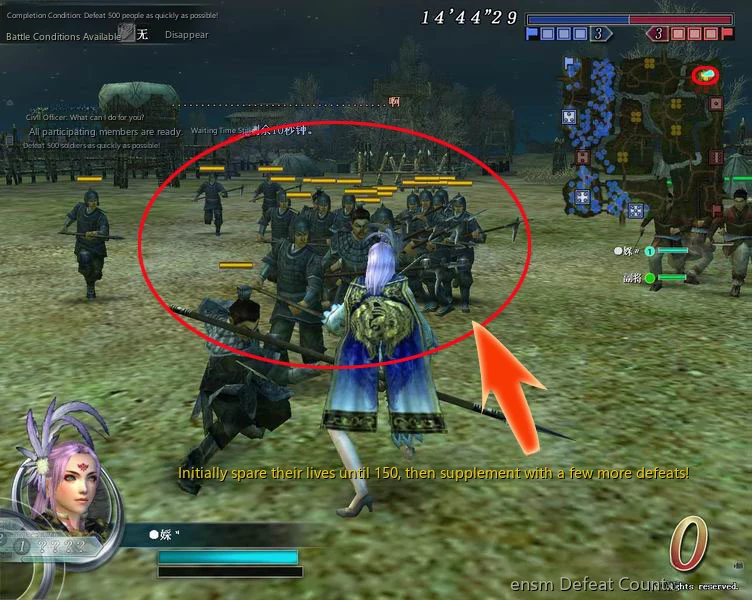
An issue to note here is that if you have a powerful Lieutenant, they may interfere when you're taking soldier points. You should know that enemies killed by Lieutenant don't count toward your defeat count. This can create an awkward situation where after taking two bases you're still short a few defeats to reach 350. Therefore we need to make some arrangements at the initial location ①. That is, don't kill the neutral soldiers you face at the start. When preparing to reach 150 defeats, first drag along a large number of soldiers, theninstantDeal with them, for example Twin Swords' DASH or formation, as long as you can exceed 150 defeats by a few, like 155, this way you can smoothly proceed with the following journey. If you accidentally get exactly 150 defeats, the first batch of soldiers will retreat, but you can use nearby neutral soldiers to make up a few defeats. One neutral soldier point has 20 defeats available, enough for Lieutenant to interfere randomly in the subsequent journey, hehe.
When approaching 150 defeats, we can deliberately save a maximum movement item with long duration, which can help us move to location ⑤ faster in the later stage.
After that it's simple. After taking the two soldier bases on the right, the defeat count exceeds 350. The final batch of soldiers spawns at location ⑤. Open a previously saved maximum movement item and quickly rush over to defeat 500 people at the fastest speed~~
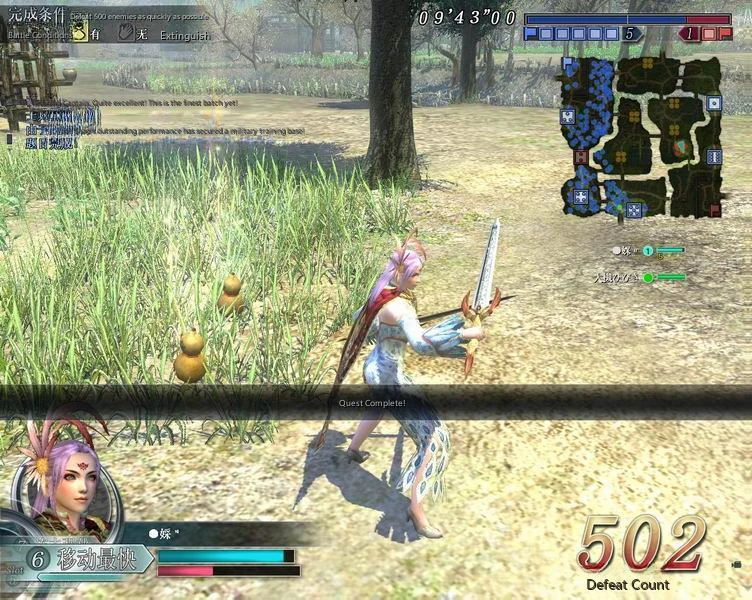
500 defeats achieved, perfectly completed the mission assigned by superiors ^^v
Overall, to achieve S rank for this quest, besides fast enemy killing speed, you also needMaster the soldier kill count, make good use of neutral soldiers and enemies within bases. Cleverly avoid the time spent killing archers and running that route. Can be said to be a quest with no difficulty.
評価別報酬
| Sランク | Aランク | Bランク | Cランク | Dランク | Eランク |
|---|
| Quest Reward | Wind Thunder Talisman x1 Extreme Vermillion Bird Wing Military Funds 250 | Wind Thunder Talisman x2 | Wind Thunder Talisman | 400 Military Funds | Military Funds 300 | Military Funds 200 |
攻略手順
スポーン時に、場所①は敵兵士100人をリフレッシュします
150人を倒すと、場所①の敵兵が全員消滅し、場所②に射手が100人出現します。
敵を 200 体倒すと、場所②の射手がすべて消え、場所③に敵兵士 100 人が出現します。
300人の敵を倒すと、場所③の敵兵士がすべて消滅し、場所④に射手100人が出現します
350人を倒すと、場所④の射手が全員消滅し、場所⑤に敵兵100人が出現します。
中立兵士はスポーン地点以外では少数しか見つからないため、複数のスポーン地点間を移動する必要があります。時間がとても迫っています。特に射手が出現すると、射手は動かず、位置がバラバラで、非常に倒しにくいので厄介です。
最終ウェーブである第 5 ウェーブの出現時には、訓練部隊のリーダーが出現します。攻撃力が非常に高く、2回攻撃を受けたら終わりです。十分に注意しなければなりません。
緑色の枠部分は、強化されていない防御力のツインソードが訓練分隊長のチャージスキルC1で1発ダメージを受け、その後失血した状態を示しています。
Sランク達成メモ
このクエストでSランクを達成するにはテクニックが必要です。上に示すように、ルートも変更する必要があります。射手が分散していて倒すのが難しく、さらに走らなければならず、多くの時間を無駄にするからです。ですので、Sランク攻略の第一の鍵は射手を殺さないようにすることです。
まず、第 1 ウェーブの兵士は 150 名で、350 名が倒されると第 5 ウェーブが出現します。私たちが解決しなければならない問題は、中盤の200敗をより早く達成することです。マップの他のエリアでは兵士がスポーンしないため、右側の 2 つの兵士基地に集中できます。各兵士基地には 100 人の兵士がおり、両方の基地を制圧するとちょうど中間の 200 撃破で合計 350 撃破に達し、最終ウェーブが発生します。
ここで注意すべき問題は、強力な中尉がいる場合、兵士ポイントを取得するときに彼らが邪魔をする可能性があることです。中尉が倒した敵は敗北数にカウントされないことを知っておく必要があります。これにより、拠点を 2 つ奪った後、350 に到達するまでにまだ数敗足りないという厄介な状況が発生する可能性があります。そのため、最初の場所①でいくつかの調整を行う必要があります。それは、最初に直面する中立の兵士を殺さないことです。 150撃破を目指す場合は、まず大量の兵を引き連れて瞬時に対処し、双剣のダッシュや陣形などで150撃破を少しでも155撃破するなど超えることができれば、スムーズに次の旅を進めることができます。誤ってちょうど 150 の敗北を喫した場合、兵士の最初のグループは撤退しますが、近くの中立の兵士を使用していくつかの敗北を補うことができます。中立兵士ポイント 1 つで 20 の敗北が可能です。中尉がその後の旅にランダムに干渉するには十分です、ふふ。
150撃破近くなったら、わざと持続時間の長い最大移動アイテムを温存しておくと、後のステージ⑤の場所への移動が早くなります。
その後は簡単です。右側の 2 つの兵士の拠点を占領した後、敗北数は 350 を超えます。最後の兵士のグループは場所⑤に出現します。以前に保存した最大移動アイテムを開いて、最速で500人を倒すために急いで駆けつけてください~~
500撃破達成、上官から与えられた任務を完璧に達成^^v
全体として、このクエストで S ランクを達成するには、敵の殺害速度が速いことに加えて、兵士の殺害数をマスターし、基地内の中立の兵士と敵をうまく活用する必要があります。射手を倒したり、そのルートを走ったりするのに費やす時間を賢く避けてください。難易度の低いクエストと言えるでしょう。
各评级奖励
| S级 | A级 | B级 | C级 | D级 | E级 |
|---|
| Quest Reward | Wind Thunder Talisman x1 Extreme Vermillion Bird Wing Military Funds 250 | Wind Thunder Talisman x2 | Wind Thunder Talisman | 400 Military Funds | Military Funds 300 | Military Funds 200 |
攻略流程
生成时,位置①刷新 100 名敌方士兵
击败 150 人后,地点 ① 的所有敌方士兵消失,地点 ② 生成 100 名弓箭手
击败 200 名敌人后,位置 ② 处的所有弓箭手消失,位置 ③ 处生成 100 名敌方士兵
击败 300 名敌人后,位置 ③ 的所有敌方士兵消失,位置 ④ 生成 100 名弓箭手
击败 350 人后,位置 ④ 的所有弓箭手消失,100 名敌方士兵出现在位置 ⑤
由于除了重生点之外只能找到少量中立士兵,因此您必须在多个重生点之间移动。时间非常紧张。尤其是弓箭手生成的时候,就很麻烦,因为弓箭手不动,位置分散,很难打败。
在第五波(即最后一波)出现期间,训练小队队长将会出现。他们的攻击力非常高,如果你被他们击中两次,那就结束了。你必须非常小心。
绿框区域显示未强化防御的双剑被训练小队队长冲锋技能C1击中后失血。
S级成就笔记
想要在这个任务中获得S级,需要技巧。路线也需要改变,如上所示。因为弓箭手分散,很难杀,而且要跑得多,浪费了很多时间。所以S级策略的首要关键就是避免击杀弓箭手。
首先,第一波有 150 名士兵,第五波在 350 名士兵被击败时产生。我们需要解决的问题是更快地获得中间200场失败。地图的其他区域不会产生士兵,所以我们可以关注右侧的两个士兵基地。每个士兵基地有 100 名士兵,拿下这两个基地后,我们将获得中间 200 场失败,从而达到 350 场总失败,从而催生最后一波。
这里需要注意的一个问题是,如果你有一个强大的中尉,他们可能会在你获取士兵积分时进行干扰。您应该知道,被中尉杀死的敌人不计入您的失败计数。这可能会造成一种尴尬的局面,拿下两个垒后,距离达到350还差几场失败。因此,我们需要在初始位置①做出一些安排。也就是说,一开始不要杀死你面对的中立士兵。准备打到150败的时候,先拖着大量的士兵,然后即时应对,比如双剑的冲刺或者阵型,只要你能超过150败几个,比如155,这样就可以顺利进行接下来的旅程。如果你不小心获得了150个失败,第一批士兵将会撤退,但你可以使用附近的中立士兵来弥补一些失败。一个中立士兵点有20次可用的失败次数,足够中尉在后续旅程中随意干预了,呵呵。
当接近150场失败时,我们可以刻意保存一个持续时间较长的最大移动物品,这可以帮助我们在后期更快地移动到位置⑤。
之后就简单了。占领右侧两个士兵基地后,失败次数超过 350。最后一批士兵在位置 ⑤ 生成。打开之前保存的最大移动项目,快速冲过去,以最快的速度击败500人~~
取得500败,完美完成上级交给的任务^^v
总的来说,这个任务要达到S级,除了杀敌速度快之外,还需要掌握士兵击杀数,善用中立士兵和基地内的敌人。巧妙地避免花在杀死弓箭手和跑那条路线上的时间。可以说是一个毫无难度的任务。
各評級獎勵
| S級 | A級 | B級 | C級 | D級 | E級 |
|---|
| Quest Reward | Wind Thunder Talisman x1 Extreme Vermillion Bird Wing Military Funds 250 | Wind Thunder Talisman x2 | Wind Thunder Talisman | 400 Military Funds | Military Funds 300 | Military Funds 200 |
攻略流程
生成時,位置①刷新 100 名敵方士兵
擊敗 150 人後,地點 ① 的所有敵方士兵消失,地點 ② 生成 100 名弓箭手
擊敗 200 名敵人後,位置 ② 處的所有弓箭手消失,位置 ③ 處生成 100 名敵方士兵
擊敗 300 名敵人後,位置 ③ 的所有敵方士兵消失,位置 ④ 生成 100 名弓箭手
擊敗 350 人後,位置 ④ 的所有弓箭手消失,100 名敵方士兵出現在位置 ⑤
由於除了重生點之外只能找到少量中立士兵,因此您必須在多個重生點之間移動。時間非常緊張。尤其是弓箭手生成的時候,就很麻煩,因為弓箭手不動,位置分散,很難打敗。
在第五波(即最後一波)出現期間,訓練小隊隊長將會出現。他們的攻擊力非常高,如果你被他們擊中兩次,那就結束了。你必須非常小心。
綠框區域顯示未強化防禦的雙劍被訓練小隊隊長衝鋒技能C1擊中後失血。
S級成就筆記
想要在這個任務中獲得S級,需要技巧。路線也需要改變,如上圖所示。因為弓箭手分散,很難殺,而且要跑得多,浪費了很多時間。所以S級策略的首要關鍵就是避免擊殺弓箭手。
首先,第一波有 150 名士兵,第五波在 350 名士兵被擊敗時產生。我們需要解決的問題是更快地獲得中間200場失敗。地圖的其他區域不會產生士兵,所以我們可以注意右側的兩個士兵基地。每個士兵基地有 100 名士兵,拿下這兩個基地後,我們將獲得中間 200 場失敗,從而達到 350 場總失敗,從而催生最後一波。
這裡需要注意的一個問題是,如果你有一個強大的中尉,他們可能會在你獲取士兵積分時幹擾。您應該知道,被中尉殺死的敵人不會計入您的失敗計數。這可能會造成一種尷尬的局面,拿下兩個壘後,距離達到350差幾場失敗。因此,我們需要在初始位置①做出一些安排。也就是說,一開始不要殺死你面對的中立士兵。準備打到150敗的時候,先拖著大量的士兵,然後即時應對,比如雙劍的衝刺或者陣型,只要你能超過150敗幾個,比如155,這樣就可以順利進行接下來的旅程。如果你不小心獲得了150個失敗,第一批士兵將會撤退,但你可以使用附近的中立士兵來彌補一些失敗。一個中立士兵點有20次可用的失敗次數,足夠中尉在後續旅程中隨意幹預了,呵呵。
當接近150場失敗時,我們可以刻意保存一個持續時間較長的最大移動物品,這可以幫助我們在後期更快地移動到位置⑤。
之後就簡單了。佔領右側兩個士兵基地後,失敗次數超過 350。最後一批士兵在位置 ⑤ 生成。打開之前保存的最大移動項目,快速衝過去,以最快的速度擊敗500人~~
取得500敗,完美完成上級交給的任務^^v
總的來說,這個任務要達到S級,除了殺敵速度快之外,還需要掌握士兵擊殺數,善用中立士兵和基地內的敵人。巧妙地避免花在殺死弓箭手和跑那條路線的時間。可以說是一個毫無難度的任務。
المكافآت حسب الرتبة
| رتبة S | رتبة | الرتبة ب | الرتبة ج | الرتبة د | الرتبة E |
|---|
| Quest Reward | Wind Thunder Talisman x1 Extreme Vermillion Bird Wing Military Funds 250 | Wind Thunder Talisman x2 | Wind Thunder Talisman | 400 Military Funds | Military Funds 300 | Military Funds 200 |
دليل الحل
عند النشر، يقوم الموقع ① بتحديث 100 جندي من جنود العدو
بعد هزيمة 150 شخصًا، يختفي جميع جنود العدو في الموقع ①، ويظهر 100 من رماة السهام في الموقع ②
بعد هزيمة 200 عدو، يختفي جميع الرماة في الموقع ②، ويظهر 100 جندي من جنود العدو في الموقع ③
بعد هزيمة 300 عدو، يختفي جميع جنود العدو في الموقع ③، ويظهر 100 من رماة السهام في الموقع ④
بعد هزيمة 350 شخصًا، يختفي جميع الرماة في الموقع ④، ويظهر 100 جندي من جنود العدو في الموقع ⑤
نظرًا لأنه لا يمكن العثور إلا على عدد صغير من الجنود المحايدين باستثناء نقاط النشر، فيجب عليك السفر بين عدة مواقع نشر. الوقت ضيق جداً. خاصة عندما يفرخ الرماة، يكون الأمر مزعجًا لأن الرماة لا يتحركون، ومتناثرون في مواقعهم، ومن الصعب جدًا هزيمتهم.
أثناء ظهور الموجة الخامسة، وهي الموجة الأخيرة، سيظهر قادة فرقة التدريب. قوتهم الهجومية عالية جدًا - إذا تعرضت للضرب مرتين، فسينتهي الأمر. يجب أن تكون حذرا للغاية.
تُظهر منطقة الإطار الأخضر دفاعًا غير معزز لـ Twin Swords يتلقى ضربة واحدة من خسارة الدم لـ Training Squad LeaderCharge Skill C1 بعد ذلك.
ملاحظات إنجاز الرتبة S
يتطلب تحقيق الرتبة S لهذه المهمة تقنية. يجب أيضًا تغيير المسار، كما هو موضح أعلاه. لأن الرماة متناثرون ويصعب قتلهم، وسيتعين عليك الركض أكثر بكثير، مما يؤدي إلى إضاعة الكثير من الوقت. لذا فإن المفتاح الأول لاستراتيجية الرتبة S هو تجنب قتل الرماة.
أولاً، تضم الموجة الأولى 150 جنديًا، وتنتشر الموجة الخامسة عند هزيمة 350 جنديًا. المشكلة التي نحتاج إلى حلها هي الحصول على الـ 200 هزيمة الوسطى بشكل أسرع. المناطق الأخرى من الخريطة لا تحتوي على جنود، لذلك يمكننا التركيز على قاعدتي الجنود على اليمين. تحتوي كل قاعدة جنود على 100 جندي، وإزالة كلتا القاعدتين يمنحنا بالضبط 200 هزيمة للوصول إلى 350 هزيمة إجمالية، مما يؤدي إلى ظهور الموجة النهائية.
هناك مشكلة يجب ملاحظتها هنا وهي أنه إذا كان لديك ملازم قوي، فقد يتدخل عندما تحصل على نقاط الجندي. يجب أن تعلم أن الأعداء الذين يقتلهم الملازم لا يتم احتسابهم ضمن عدد الهزائم الخاصة بك. يمكن أن يخلق هذا موقفًا محرجًا حيث لا يزال أمامك بضع هزائم بعد الاستيلاء على قاعدتين للوصول إلى 350. لذلك نحتاج إلى إجراء بعض الترتيبات في الموقع الأولي ①. أي لا تقتل الجنود المحايدين الذين تواجههم في البداية. عند الاستعداد للوصول إلى 150 هزيمة، قم أولاً بسحب عدد كبير من الجنود، ثم تعامل معهم بشكل فوري، على سبيل المثال Twin Swords' DASH أو التشكيل، طالما يمكنك تجاوز 150 هزيمة بعدد قليل، مثل 155، وبهذه الطريقة يمكنك المضي قدمًا بسلاسة في الرحلة التالية. إذا حصلت عن طريق الخطأ على 150 هزيمة بالضبط، فسوف تتراجع الدفعة الأولى من الجنود، لكن يمكنك استخدام الجنود المحايدين القريبين لتعويض بعض الهزائم. نقطة جندي محايد واحدة لديها 20 هزيمة متاحة، وهو ما يكفي للملازم للتدخل بشكل عشوائي في الرحلة اللاحقة، هيهي.
عند الاقتراب من 150 هزيمة، يمكننا عمدًا حفظ الحد الأقصى لعنصر الحركة لمدة طويلة، مما يمكن أن يساعدنا على الانتقال إلى الموقع ⑤ بشكل أسرع في المرحلة اللاحقة.
بعد ذلك الأمر بسيط. بعد الاستيلاء على قاعدتي الجنديين على اليمين، يتجاوز عدد الهزيمة 350. تظهر الدفعة الأخيرة من الجنود في الموقع ⑤. افتح عنصر الحركة الأقصى الذي تم حفظه مسبقًا واندفع بسرعة لهزيمة 500 شخص بأقصى سرعة ~~
تم تحقيق 500 هزيمة، وأكملت المهمة التي حددها الرؤساء بشكل مثالي ^^v
بشكل عام، لتحقيق الرتبة S لهذه المهمة، إلى جانب سرعة قتل العدو السريعة، تحتاج أيضًا إلى إتقان عدد مرات قتل الجندي، والاستفادة بشكل جيد من الجنود والأعداء المحايدين داخل القواعد. تجنب بذكاء الوقت الذي تقضيه في قتل الرماة وتشغيل هذا الطريق. يمكن القول أنه مسعى دون أي صعوبة.
รางวัลตามระดับ
| อันดับ S | อันดับ | อันดับบี | อันดับซี | อันดับ D | อันดับ E |
|---|
| Quest Reward | Wind Thunder Talisman x1 Extreme Vermillion Bird Wing Military Funds 250 | Wind Thunder Talisman x2 | Wind Thunder Talisman | 400 Military Funds | Military Funds 300 | Military Funds 200 |
วิธีเล่นผ่าน
เมื่อวางไข่ ตำแหน่งที่ 1 จะรีเฟรชทหารศัตรู 100 นาย
หลังจากเอาชนะผู้คนได้ 150 คน ทหารศัตรูทั้งหมดในตำแหน่งที่ 1 จะหายไป และนักธนู 100 คนจะเกิดที่ตำแหน่ง 2
หลังจากเอาชนะศัตรูได้ 200 ตัว นักธนูทั้งหมดในตำแหน่งที่ 2 จะหายไป ทหารศัตรู 100 นายจะเกิดที่ตำแหน่งที่ 3
หลังจากเอาชนะศัตรูได้ 300 ตัว ทหารศัตรูทั้งหมดในตำแหน่ง ④ จะหายไป นักธนู 100 ตัวเกิดที่ตำแหน่ง ④
หลังจากเอาชนะผู้คนได้ 350 คน นักธนูทั้งหมดในตำแหน่ง ④ จะหายไป และทหารศัตรู 100 นายเกิดที่ตำแหน่ง ⑤
เนื่องจากสามารถพบทหารเป็นกลางได้จำนวนไม่มาก ยกเว้นที่จุดวางไข่ คุณจึงต้องเดินทางระหว่างจุดวางไข่หลายแห่ง เวลาแน่นมาก โดยเฉพาะอย่างยิ่งเมื่อนักธนูเกิดจะลำบากเพราะนักธนูไม่ขยับ กระจัดกระจายอยู่ในตำแหน่ง และยากต่อการเอาชนะ
ในระหว่างการเกิดระลอกที่ 5 ซึ่งเป็นระลอกสุดท้าย หัวหน้าหน่วยฝึกอบรมจะปรากฏขึ้น พลังโจมตีของพวกมันสูงมาก - หากคุณถูกพวกมันโจมตีสองครั้ง มันก็จะจบลง คุณจะต้องระมัดระวังให้มาก
พื้นที่กรอบสีเขียวแสดงดาบคู่ป้องกันที่ไม่ได้รับการปรับปรุง รับการโจมตีหนึ่งครั้งจากทักษะ Training Squad LeaderCharge C1 สูญเสียเลือดหลังจากนั้น
บันทึกความสำเร็จระดับ S
เพื่อให้บรรลุอันดับ S สำหรับภารกิจนี้ต้องใช้เทคนิค จำเป็นต้องเปลี่ยนเส้นทางดังที่แสดงไว้ด้านบน เพราะนักธนูกระจัดกระจายและยากต่อการฆ่าและคุณต้องวิ่งอีกมากทำให้เสียเวลามาก ดังนั้นกุญแจดอกแรกในกลยุทธ์อันดับ S คือหลีกเลี่ยงการฆ่านักธนู
อันดับแรก คลื่นลูกแรกมีทหาร 150 นาย และคลื่นลูกที่ห้าจะเกิดขึ้นเมื่อกำจัดทหารได้ 350 นาย ปัญหาที่เราต้องแก้ไขคือการเอาชนะกลาง 200 ให้เร็วขึ้น พื้นที่อื่นๆ ของแผนที่ไม่มีการวางไข่ของทหาร ดังนั้นเราจึงสามารถมุ่งความสนใจไปที่ฐานทหารทั้งสองทางด้านขวาได้ ฐานทหารแต่ละฐานมีทหาร 100 นาย การยึดฐานทั้งสองนั้นทำให้เราพ่ายแพ้ตรงกลาง 200 ครั้งจึงจะเอาชนะได้ทั้งหมด 350 ครั้ง ทำให้เกิดคลื่นลูกสุดท้าย
ปัญหาที่ควรทราบคือ ถ้าคุณมีผู้หมวดที่มีอำนาจ พวกเขาอาจรบกวนเมื่อคุณรับคะแนนทหาร คุณควรรู้ว่าศัตรูที่ถูกผู้หมวดสังหารจะไม่นับรวมในการนับความพ่ายแพ้ของคุณ นี่สามารถสร้างสถานการณ์ที่น่าอึดอัดใจได้ โดยหลังจากยึดฐานได้แล้ว 2 ฐาน คุณยังแพ้อีกเล็กน้อยเพื่อไปถึง 350 ดังนั้น เราจึงต้องเตรียมการบางอย่างที่ตำแหน่งเริ่มแรก 1 นั่นคืออย่าฆ่าทหารเป็นกลางที่คุณเผชิญหน้าตั้งแต่เริ่มต้น เมื่อเตรียมที่จะเอาชนะ 150 ครั้ง ขั้นแรกให้ลากทหารจำนวนมากไปตามนั้น จากนั้นจัดการกับทหารเหล่านั้นทันที เช่น DASH หรือรูปขบวนของ Twin Swords ตราบใดที่คุณสามารถเอาชนะได้เกิน 150 ครั้งด้วยการโจมตีเพียงไม่กี่ครั้ง เช่น 155 ครั้ง วิธีนี้จะทำให้คุณสามารถเดินทางต่อไปได้อย่างราบรื่น หากคุณพ่ายแพ้โดยไม่ได้ตั้งใจ 150 ครั้ง ทหารชุดแรกจะล่าถอย แต่คุณสามารถใช้ทหารเป็นกลางที่อยู่ใกล้เคียงเพื่อชดเชยความพ่ายแพ้บางส่วนได้ คะแนนทหารที่เป็นกลางหนึ่งคะแนนสามารถเอาชนะได้ 20 ครั้ง ซึ่งเพียงพอให้ผู้หมวดเข้ามาแทรกแซงแบบสุ่มในการเดินทางครั้งต่อไป อิอิ
เมื่อเข้าใกล้ความพ่ายแพ้ 150 ครั้ง เราสามารถจงใจบันทึกรายการการเคลื่อนไหวสูงสุดที่มีระยะเวลายาวนาน ซึ่งสามารถช่วยให้เราเคลื่อนที่ไปยังตำแหน่ง ⑤ เร็วขึ้นในระยะต่อมา
หลังจากนั้นมันก็ง่าย หลังจากยึดฐานทัพทหารทั้งสองทางด้านขวาแล้ว จำนวนความพ่ายแพ้เกิน 350 ทหารกลุ่มสุดท้ายจะเกิดที่ตำแหน่งที่ ⑤ เปิดรายการการเคลื่อนไหวสูงสุดที่บันทึกไว้ก่อนหน้านี้แล้วรีบเร่งเพื่อเอาชนะผู้คน 500 คนด้วยความเร็วสูงสุด~~
เอาชนะ 500 ครั้ง สำเร็จภารกิจที่ได้รับมอบหมายจากผู้บังคับบัญชาอย่างสมบูรณ์แบบ ^^v
โดยรวมแล้ว เพื่อให้บรรลุอันดับ S สำหรับภารกิจนี้ นอกจากความเร็วในการฆ่าศัตรูที่รวดเร็วแล้ว คุณยังต้องเชี่ยวชาญการนับจำนวนการสังหารของทหาร ใช้ทหารที่เป็นกลางและศัตรูภายในฐานให้เกิดประโยชน์ หลีกเลี่ยงเวลาที่ใช้ในการฆ่านักธนูและวิ่งไปตามเส้นทางนั้นอย่างชาญฉลาด เรียกได้ว่าเป็นภารกิจที่ไม่ยากเลย