Rewards by Rank
| S Rank | A Rank | B Rank | C Rank | D Rank | E Rank |
|---|
| Quest Rewards | Divine Talisman Water x2 Jade Cutter x2 Cold Resistance Charm Liquid Dye x1 | Azure Dragon Gallbladder x4 Divine Talisman Water x2 | Azure Dragon Gallbladder x4 Ultimate Talisman Water | Azure Dragon Gallbladder x4 | Azure Dragon Gall x2 | Azure Dragon Gall Military Funds 300 |
Walkthrough
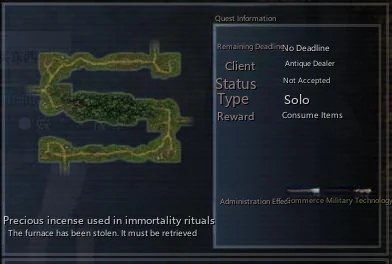
The map looks very complex, doesn't it? Actually, this quest is quite special compared to other quests, with two most distinctive features:
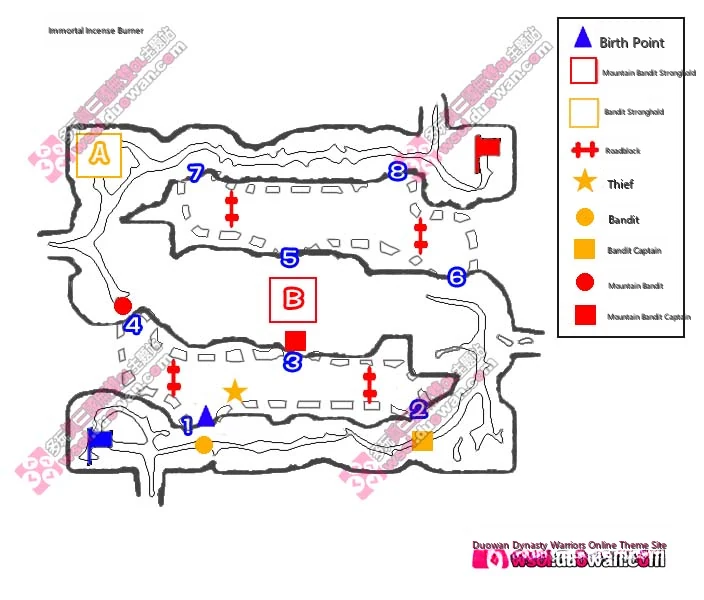
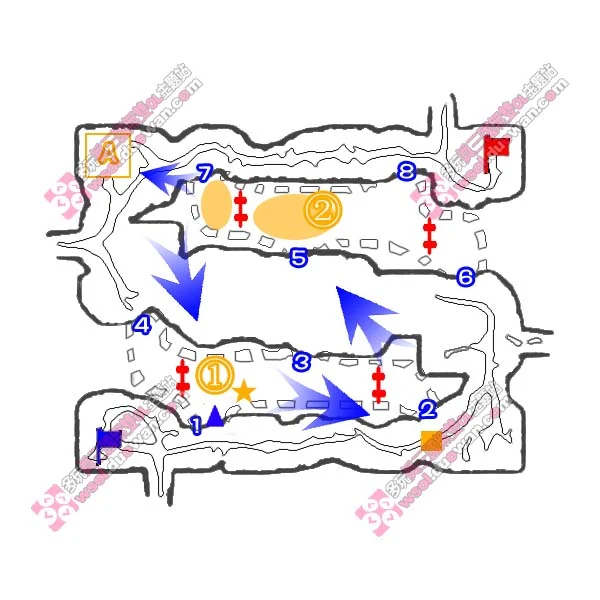
First, there are hidden passages in the blank areas of the map, which I've marked with dotted blocks. The entrances and exits of these passages are numbered 1,2,3,4...7,8. I call the two areas within the dotted blocks South Forest and North Forest. Note that in these 2 areas, the mini-map doesn't work.
Second, the quest has branches, divided into 2 major branches: Bandit route and Brigand route.
The bandit route is further divided into Kill Bandit sub-route A and Kill Bandit Captain sub-route B.
The bandit route is divided into route A for killing bandits and route B for killing bandit captains.
That is to say, there are 4 almost completely different ways to complete the quest, and the 2 major branches have different requirements for S Rank evaluation.
Are you feeling a bit dizzy? Actually this quest is quite simple. Next, I'll introduce you to all 4 strategy methods from the 2 major categories.
If this is your first time doing this quest, you'll definitely feel uncomfortable - the mini-map is completely useless in the dense forest area.
First, after the quest begins, kill the bandit first. This step is mandatory. Then the map shows the locations of 4 suspicious people, which are the 4 routes.
First, let's look at sub-route A: Kill Bandit
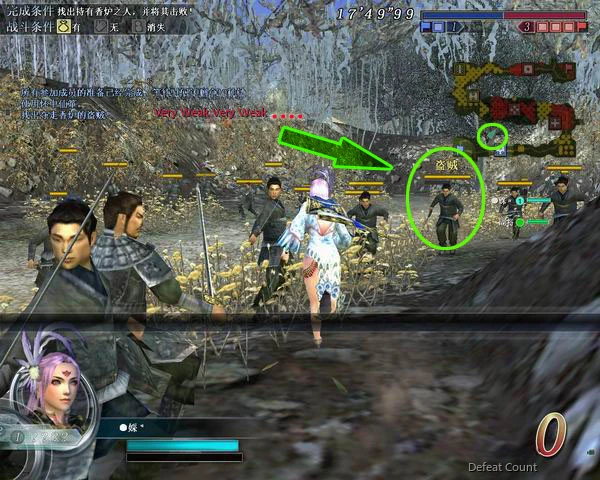
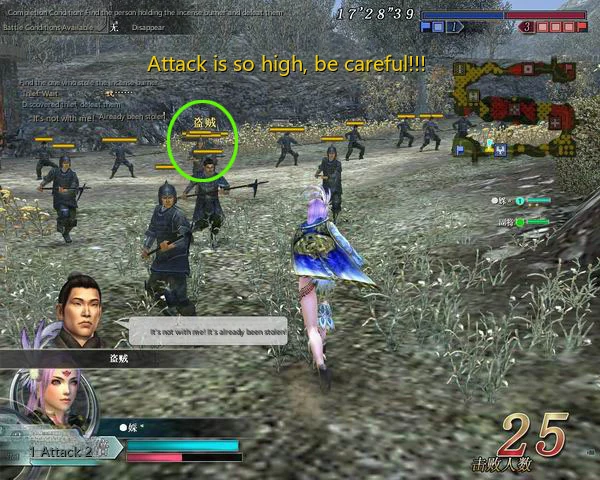
The bandit is near entrance 1. Note his attack is very high and he has super armor. After defeating him, the other 3 suspicious people disappear, and you officially enter sub-route A
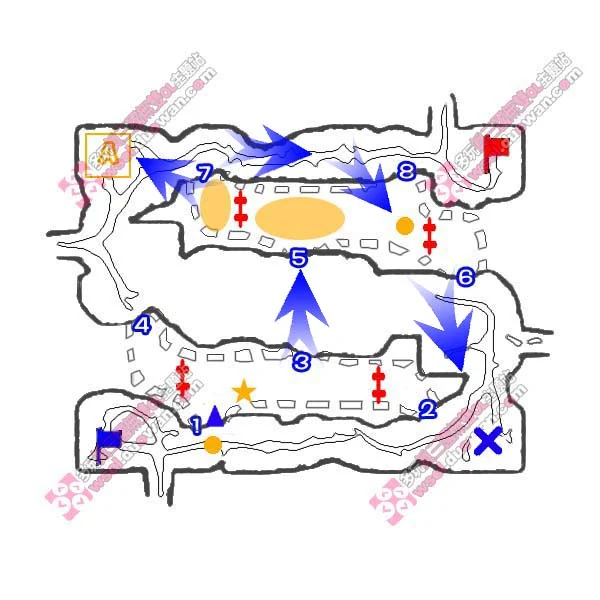
After you defeat the bandit, he hides. To find him, go through entrances 3 and 5 to reach North Forest. Upon arriving at North Forest, enemy ambushes appear in the green area shown. Kill them all without missing any, 60 total.Don't touch the red enemies, they have nothing to do with sub-route A, going to kill them is a waste of time. Please be very careful when killing here, because the mini-map is useless and you need to use your eyes to observe if any are missed. Half of them are archers, so it takes a lot of effort to kill them.
Similarly, this enemy clearing step can also be completed by only killing the gourd boys!
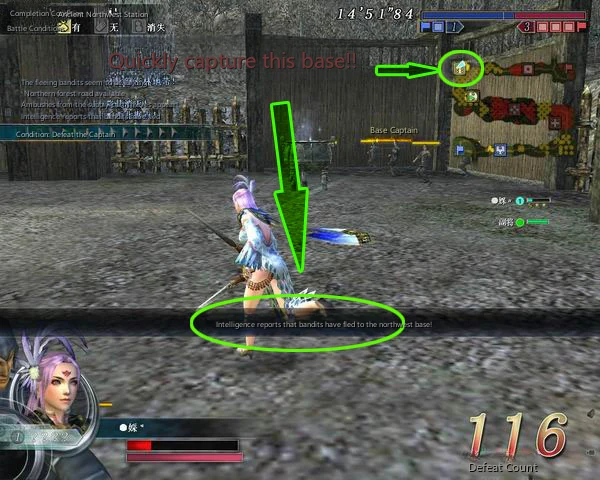
After killing them, the system prompts you to occupy Base A. The occupation method isSquad Leader Defeat.
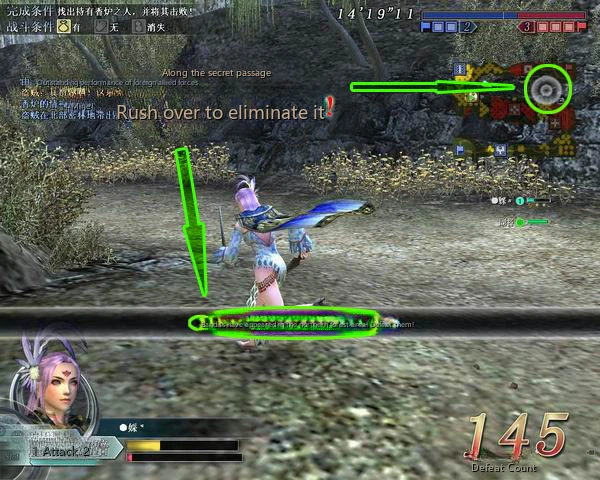
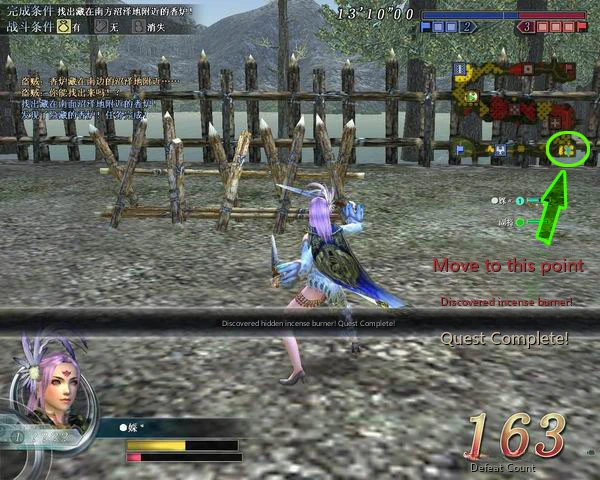
After occupying, discovered the Immortal Incense Burner is not in this base, and the bandit who was hiding earlier appears in the northern dense forest. Go through entrance 7 or 8 to defeat him.
After clearing, proceed to the blue X location on the map and the quest ends.
The entrances to the forest are very hidden, don't miss them.
Next, let's look at sub-route B: Kill Bandit Captain
After defeating the bandit,Ignore the bandits near entrance 1Go to near entrance 2 and kill the Bandit Captain, also eliminate all nearby enemies.
Then the system prompts you to go to North Forest. When passing through entrance 5, ambush enemies appear. Same as route A, eliminate them all without leaving any survivors.
Then the system promptsGo to Base A, but don't actually occupy itThis is different from sub-route A, remember this. When approaching Base A, the leader appears at position ①. Go through entrance 4 or 3 to kill him. Note that the leader has steel body and very high attack power.
The leader appearing at ① is fakeIf the remaining time is less than 11 minutes after defeating them, the quest will end immediately. If more than 11 minutes remain, the real leader will appear at location ②. Defeat the real leader and the quest ends.
Next, let's look at sub-route a: Kill Bandits
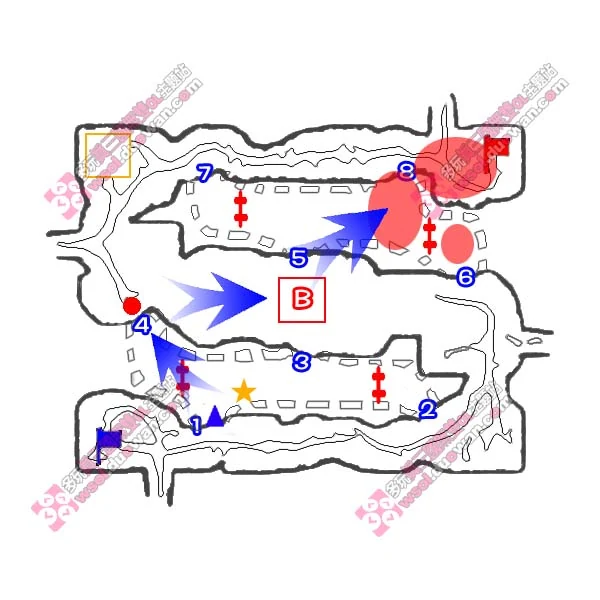
Similarly, first kill the thief, then go near entrance 4 and kill the bandits there.
Then the system requires you to capture Base B. The capture method isTower Demolition.
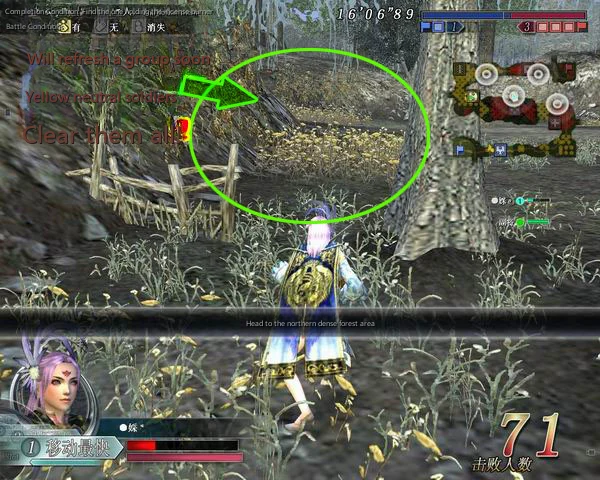
After destroying it, go through entrance 5 to the northern dense forest. Ambush troops will appear right after entering. Note: please eliminate all enemies in the 2 red areas within the forest shown in the image. The yellow enemies are irrelevant.
After killing them, the system prompts to go to the enemy granary. Pass through entrance 8 to reach the granary, and suddenly a large group of enemies appears halfway, totaling 160, including 20 archers.
Kill them all, quest complete.
Finally, let's look at route branch b: Defeat the Bandit Squad Leader
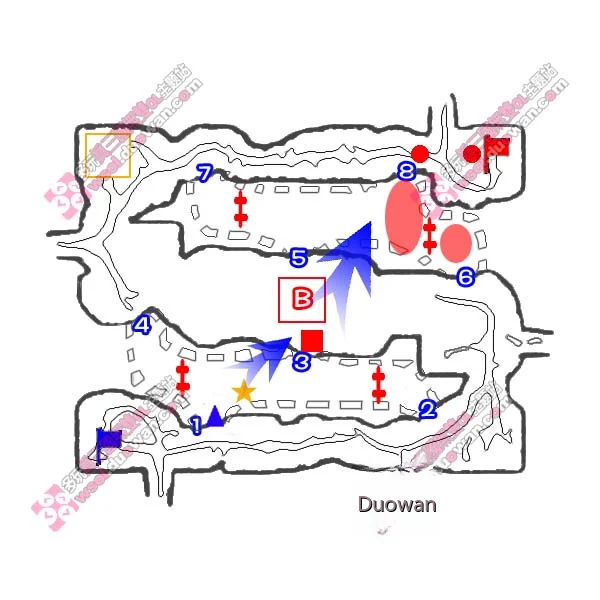
After killing the thief, go through entrance 3 to kill the Bandit Captain there. You must also eliminate all surrounding enemies, 30 total, including 20 archers.
After defeating them, the system prompts you to go to North Forest. When passing through entrance 5, enemy ambushes appear. Same as sub-route a, eliminate them.
Next the quest requires you to go to the enemy granary, pass through entrance 8, and halfway another large batch of enemies appears, but this time there are 2 officers, Wang Huai and Zhang Dang respectively. However, this doesn't matter much. After defeating these 2, the quest ends. Note they both have super armor and very high attack power.
S Rank Achievement Notes
As I mentioned at the beginning, this quest has two major routes with 4 sub-routes total. That means 4 different endings.The requirements for getting S rank on these two major routes are completely different.Among them, the bandit route requires you to complete the quest with remaining time of 10 minutes 07 seconds or more. The bandit route requires completing the quest with 1200+ KO count.
Which path you choose is your freedom.Route B requires defeating the real leader to get S rank. If you kill the fake leader the quest ends, even if there are still 10+ minutes remaining, you can still only get A rank.
Finally, one more thing to note: when passing through entrance 5, sometimes the ambush troops may not spawn. I suggest everyone stand at entrance 5 for 1-2 seconds. This problem won't occur much then. I personally feel this is a small bug in the quest.
評価別報酬
| Sランク | Aランク | Bランク | Cランク | Dランク | Eランク |
|---|
| Quest Rewards | Divine Talisman Water x2 Jade Cutter x2 Cold Resistance Charm Liquid Dye x1 | Azure Dragon Gallbladder x4 Divine Talisman Water x2 | Azure Dragon Gallbladder x4 Ultimate Talisman Water | Azure Dragon Gallbladder x4 | Azure Dragon Gall x2 | Azure Dragon Gall Military Funds 300 |
攻略手順
地図は非常に複雑に見えますね。実際、このクエストは他のクエストと比べて非常に特殊で、最も際立った特徴が 2 つあります。
まず、マップの空白の領域に隠し通路があり、点線のブロックでマークしました。これらの通路の入口と出口には 1、2、3、4...7、8 の番号が付けられています。私は点線のブロック内の 2 つのエリアを南の森と北の森と呼んでいます。これら 2 つのエリアではミニマップが機能しないことに注意してください。
次に、クエストには分岐があり、山賊ルートと山賊ルートの大きく2つの分岐に分かれます。
山賊ルートはさらに、山賊殺害サブルートAと山賊隊長キルサブルートBに分かれています。
山賊ルートは山賊を倒すルートAと山賊長を倒すルートBに分かれています。
つまり、クエストを完了する方法はほぼまったく異なる4つあり、2つの主要な分岐ではSランク評価の要件が異なります。
少しめまいを感じていますか?実はこのクエストは非常に簡単です。次に、大きく2つのカテゴリから4つの攻略法をすべて紹介します。
このクエストを初めて行う場合は、間違いなく不快に感じるでしょう。密林地帯ではミニマップはまったく役に立ちません。
まずクエストが始まったらまずは山賊を倒します。このステップは必須です。すると、地図には4つの不審者の位置、つまり4つのルートが表示されます。
まずはサブルートA「山賊を倒す」を見てみましょう。
盗賊は入り口 1 の近くにいます。彼の攻撃力は非常に高く、スーパーアーマーを持っていることに注意してください。倒すと他の不審者3人が消え、正式にサブルートAに突入
山賊を倒した後、彼は隠れます。彼を見つけるには、入り口 3 と 5 を通って北の森に到達してください。北の森に到着すると、表示されている緑色のエリアに敵の待ち伏せが現れます。全員逃さず倒す、合計60体。赤い敵には触れないでください。サブルートAとは関係ありません。倒しに行くのは時間の無駄です。ミニマップは役に立たず、見逃されていないかどうかを目で観察する必要があるため、ここで殺すときは十分に注意してください。彼らの半数は弓兵なので、倒すには多大な努力が必要です。
同様に、この敵の掃討ステップもひょうたん坊やを倒すだけでクリアできます!
彼らを倒した後、システムは基地 A を占領するように促します。占領方法は分隊長を倒すことです。
占領後、不滅の香炉がこの拠点にないことが判明し、北の密林に先ほど隠れていた山賊が現れます。入り口7か8を通って彼を倒します。
クリア後、マップ上の青い×の場所へ進むとクエスト終了となります。
森への入り口は非常に隠されているので、見逃さないでください。
次はサブルートB「山賊団長を倒す」です。
山賊を倒した後、入り口1付近の山賊を無視して入り口2付近に行き、山賊長を倒し、近くの敵もすべて排除します。
次に、システムは北の森に行くように指示します。 5番入口を通過すると待ち伏せ敵が出現します。ルートAと同様、生存者を残さず全員殲滅します。
次に、システムは「拠点 A に移動します」というプロンプトを表示しますが、実際には占領しないでください。これはサブルート A とは異なります。これを覚えておいてください。拠点Aに近づくとリーダーが①の位置に出現します。入り口4または3を通って彼を殺します。リーダーは鋼鉄の体を持ち、攻撃力が非常に高いので注意してください。
①で出現するリーダーは偽物である 倒して残り時間が11分を切るとクエストは即終了となる。残り11分以上になると、②の場所に真のリーダーが出現します。真のリーダーを倒すとクエストが終了します。
次にサブルートa:山賊を倒すです。
同様に、まず盗賊を倒し、次に入り口4の近くに行き、そこにいる盗賊を倒します。
次に、システムは基地 B を占領するように要求します。占領方法はタワー破壊です。
破壊後、入口5から北の密林へ。入ってすぐに伏兵が現れます。注: 画像に示されている森内の 2 つの赤いエリアにいる敵をすべて排除してください。黄色い敵は関係ありません。
彼らを殺害した後、システムは敵の穀倉に行くように促します。入口8を通って穀倉に到達すると、途中で突然敵の大群が現れ、射手20名を含む総勢160名。
全員殺してクエスト完了。
最後に、ルート分岐b:山賊の分隊長を倒すを見てみましょう。
泥棒を倒した後、入り口3を通ってそこにいる山賊のキャプテンを殺します。また、周囲の敵をすべて排除し、射手 20 名を含む合計 30 名を排除する必要があります。
彼らを倒すと、システムは北の森に行くように促します。入り口5を通過すると、敵の待ち伏せが現れます。サブルートaと同様に削除します。
次に、クエストでは敵の穀倉に行き、入り口 8 を通過する必要があります。途中で別の大量の敵が現れますが、今回はそれぞれ王淮と張当という 2 人の将校がいます。ただし、これはあまり問題ではありません。この2体を倒すとクエスト終了となります。どちらもスーパーアーマーと非常に高い攻撃力を持っていることに注意してください。
Sランク達成メモ
冒頭でも述べた通り、このクエストは大きく2つのルート、合計4つのサブルートがあります。つまりエンディングは4種類。この2大ルートではSランクの条件が全く異なります。このうち盗賊ルートは残り時間10分07秒以上でクエストをクリアする必要があります。山賊ルートはKO数1200以上でクエストをクリアする必要がある。
どちらの道を選ぶかはあなたの自由です。BルートではSランクを獲得するために真のリーダーを倒す必要があります。偽リーダーを倒すとクエストは終了しますが、残り10分以上あってもAランクしか獲得できません。
最後に、もう 1 つ注意点があります。入口 5 を通過するときに、待ち伏せ部隊がスポーンしない場合があります。全員が入口 5 に 1 ~ 2 秒間立つことをお勧めします。そうすればこの問題はあまり発生しません。個人的にはこれはクエストの小さなバグだと感じています。
各评级奖励
| S级 | A级 | B级 | C级 | D级 | E级 |
|---|
| Quest Rewards | Divine Talisman Water x2 Jade Cutter x2 Cold Resistance Charm Liquid Dye x1 | Azure Dragon Gallbladder x4 Divine Talisman Water x2 | Azure Dragon Gallbladder x4 Ultimate Talisman Water | Azure Dragon Gallbladder x4 | Azure Dragon Gall x2 | Azure Dragon Gall Military Funds 300 |
攻略流程
地图看起来很复杂,不是吗?其实这个任务和其他任务相比还是比较特别的,有两个最显着的特点:
首先,地图的空白区域有隐藏的通道,我用虚线块标记了它们。这些通道的出入口编号为1,2,3,4...7,8。我将虚线块内的两个区域称为“南森林”和“北森林”。请注意,在这两个区域中,小地图不起作用。
其次,任务有分支,分为2大分支:强盗路线和强盗路线。
强盗路线又分为杀强盗子路线A和杀强盗队长子路线B。
土匪路线分为A路杀土匪和B路杀土匪队长。
也就是说,有4种几乎完全不同的方式来完成任务,并且2大分支对于S级评价的要求也不同。
你感觉有点头晕吗?其实这个任务很简单。接下来,我将向您介绍两大类的全部 4 种策略方法。
如果这是你第一次做这个任务,你肯定会感到不舒服——小地图在茂密的森林地区完全没有用处。
首先,任务开始后,先杀掉强盗。此步骤是强制性的。然后地图上显示了4个可疑人的位置,也就是4条路线。
首先我们看一下支线A:杀匪
强盗就在1号入口附近。注意他的攻击力非常高,而且他有超级护甲。击败他后,其他3个可疑人物消失,正式进入A支路
当你打败强盗后,他就躲了起来。要找到他,请穿过 3 号和 5 号入口到达北森林。到达北部森林后,敌人的伏击出现在如图所示的绿色区域。全部杀掉,不漏掉,一共60个。不要碰红色的敌人,他们与A路无关,杀掉他们是浪费时间。在这里杀的时候要非常小心,因为小地图没什么用,需要用眼睛观察是否有遗漏。其中有一半是弓箭手,想要杀死他们需要花费很大的力气。
同样的,这个清敌步骤也可以只杀掉葫芦娃就完成!
杀死他们后,系统会提示你占领基地A,占领方法是班长击败。
占领之后,发现仙香炉不在这个基地内,而先前躲藏的强盗则出现在北部密林之中。通过7号或8号入口击败他。
通关后,前往地图上蓝色X位置,任务结束。
森林的入口非常隐蔽,不要错过。
接下来看支线B:击杀强盗队长
击败强盗后,忽略1号入口附近的强盗,前往2号入口附近杀死强盗队长,并消灭附近所有敌人。
然后系统会提示你前往北森林。当穿过5号入口时,埋伏的敌人就会出现。和A路一样,将他们全部消灭,不留任何幸存者。
然后系统提示前往基地A,但不要实际占领它,这与子路线A不同,记住这一点。当接近A基地时,领导者出现在位置①。从4号或3号入口杀掉他。请注意,首领拥有钢铁般的身体和非常高的攻击力。
①出现的首领是假的,如果击败他们后剩余时间少于11分钟,任务将立即结束。如果剩余时间超过11分钟,真正的领先者将出现在位置②。击败真正的领导者,任务结束。
接下来看子路线a:杀匪
同样的,先杀掉小偷,然后到4号入口附近杀掉那里的强盗。
然后系统要求你占领B基地。占领方式是拆除塔楼。
摧毁它后,通过5号入口到达北部密林。进入后伏击部队就会出现。注意:请消灭图中森林内2个红色区域内的所有敌人。黄色的敌人是无关紧要的。
杀死他们后,系统提示前往敌方粮仓。通过8号入口到达粮仓,半路上突然出现一大群敌人,总共160人,其中弓箭手20人。
把他们全部杀掉,任务完成。
最后看b路分支:击败强盗小队长
杀死小偷后,进入3号入口,杀死那里的强盗队长。你还必须消灭周围的所有敌人,总共 30 名,其中包括 20 名弓箭手。
击败他们后,系统会提示你前往北森林。当穿过5号入口时,敌人伏击出现。与子路线a相同,消除。
接下来任务要求你去敌人粮仓,穿过8号入口,中途又出现一大群敌人,不过这次有2个军官,分别是王怀和张荡。不过,这并不重要。击败这两个后,任务结束。请注意,他们都拥有超级装甲和非常高的攻击力。
S级成就笔记
正如我在一开始提到的,这个任务有两条主线,总共有 4 条子线。这意味着4个不同的结局。这两条主要路线获得S等级的要求完全不同。其中,强盗路线要求你在剩余时间10分07秒或更长的时间内完成任务。强盗路线需要以1200+的KO数完成任务。
选择哪条路是你的自由。B路需要击败真正的领袖才能获得S等级。如果杀了假首领任务就结束了,即使还有10分钟以上,你也只能获得A级。
最后,还有一点需要注意:通过5号入口时,有时伏击部队可能不会出现。我建议大家在5号入口处站立1-2秒。到时候这个问题就不会再出现了。我个人觉得这是任务中的一个小bug。
各評級獎勵
| S級 | A級 | B級 | C級 | D級 | E級 |
|---|
| Quest Rewards | Divine Talisman Water x2 Jade Cutter x2 Cold Resistance Charm Liquid Dye x1 | Azure Dragon Gallbladder x4 Divine Talisman Water x2 | Azure Dragon Gallbladder x4 Ultimate Talisman Water | Azure Dragon Gallbladder x4 | Azure Dragon Gall x2 | Azure Dragon Gall Military Funds 300 |
攻略流程
地圖看起來很複雜,不是嗎?其實這個任務和其他任務相比還是比較特別的,有兩個最顯著的特點:
首先,地圖的空白區域有隱藏的通道,我用虛線塊標記了它們。這些通道的出入口編號為1,2,3,4...7,8。我將虛線塊內的兩個區域稱為「南森林」和「北森林」。請注意,在這兩個區域中,小地圖不起作用。
其次,任務有分支,分為2大分支:強盜路線和強盜路線。
強盜路線又分為殺強盜子路線A和殺強盜隊長子路線B。
土匪路線分為A路殺土匪和B路殺土匪隊長。
也就是說,有4種幾乎完全不同的方式來完成任務,而2大分支對於S級評估的要求也不同。
你覺得有點頭暈嗎?其實這個任務很簡單。接下來,我將向您介紹兩大類的全部 4 種策略方法。
如果這是你第一次做這個任務,你肯定會感到不舒服——小地圖在茂密的森林地區完全沒有用處。
首先,任務開始後,先殺掉強盜。此步驟是強制性的。然後地圖上顯示了4個可疑人的位置,也就是4條路線。
首先我們來看看支線A:殺匪
強盜就在1號入口附近。注意他的攻擊力非常高,而且他有超級護甲。擊敗他後,其他3個可疑人物消失,正式進入A支路
當你打敗強盜後,他就躲了起來。要找到他,請穿過 3 號和 5 號入口到達北森林。到達北部森林後,敵人的伏擊出現在如圖所示的綠色區域。全部殺掉,不漏掉,總共60個。不要碰紅色的敵人,他們與A路無關,殺掉他們是浪費時間。在這裡殺的時候要非常小心,因為小地圖沒什麼用,需要用眼睛觀察是否有遺漏。其中有一半是弓箭手,想要殺死他們需要花費很大的力量。
同樣的,這個清敵步驟也可以只殺掉葫蘆娃就完成!
殺死他們後,系統會提示你佔領基地A,佔領方法是班長擊敗。
佔領之後,發現仙香爐不在這個基地內,而先前躲藏的強盜則出現在北部密林之中。通過7號或8號入口擊敗他。
通關後,前往地圖上藍色X位置,任務結束。
森林的入口非常隱蔽,不要錯過。
接下來看支線B:擊殺強盜隊長
擊敗強盜後,忽略1號入口附近的強盜,前往2號入口附近殺死強盜隊長,並消滅附近所有敵人。
然後系統會提示你前往北森林。當穿過5號入口時,埋伏的敵人就會出現。和A路一樣,將他們全部消滅,不留任何倖存者。
然後系統提示前往基地A,但不要實際佔領它,這與子路線A不同,記住這一點。當接近A基地時,領導者出現在位置①。從4號或3號入口殺掉他。請注意,首領擁有鋼鐵般的身體和非常高的攻擊力。
①出現的首領是假的,如果擊敗他們後剩餘時間少於11分鐘,任務將立即結束。如果剩餘時間超過11分鐘,真正的領先者將出現在位置②。擊敗真正的領導者,任務結束。
接下來看子路線a:殺匪
同樣的,先殺掉小偷,然後到4號入口附近殺掉那裡的強盜。
然後系統要求你佔領B基地。佔領方式是拆除塔樓。
摧毀它後,通過5號入口到達北部密林。進入後伏擊部隊就會出現。注意:請消滅圖中森林內2個紅色區域內的所有敵人。黃色的敵人是無關緊要的。
殺死他們後,系統提示前往敵方糧倉。通過8號入口到達穀倉,半路上突然出現一大群敵人,總共160人,其中弓箭手20人。
把他們全部殺掉,任務完成。
最後看b路分支:擊敗強盜小隊長
殺死小偷後,進入3號入口,殺死那裡的強盜隊長。你還必須消滅周圍的所有敵人,總共 30 名,其中包括 20 名弓箭手。
擊敗他們後,系統會提示你前往北森林。當穿過5號入口時,敵人伏擊出現。與子路線a相同,消除。
接下來任務要你去敵人糧倉,穿過8號入口,中途又出現一大群敵人,不過這次有2個軍官,分別是王懷和張蕩。不過,這並不重要。擊敗這兩個後,任務結束。請注意,他們都擁有超級裝甲和非常高的攻擊力。
S級成就筆記
正如我在一開始提到的,這個任務有兩條主線,總共有 4 條子線。這意味著4個不同的結局。這兩條主要路線獲得S等級的要求完全不同。其中,強盜路線要求你在剩餘時間10分07秒或更長的時間內完成任務。強盜路線需要以1200+的KO數完成任務。
選擇哪條路就是你的自由。 B路需要擊敗真正的領袖才能獲得S等級。如果殺了假首領任務就結束了,即使還有10分鐘以上,你也只能拿到A級。
最後,還有一點要注意:通過5號入口時,有時伏擊部隊可能不會出現。我建議大家在5號入口處站立1-2秒。到時候這個問題就不會再出現了。我個人覺得這是任務中的小bug。
المكافآت حسب الرتبة
| رتبة S | رتبة | الرتبة ب | الرتبة ج | الرتبة د | الرتبة E |
|---|
| Quest Rewards | Divine Talisman Water x2 Jade Cutter x2 Cold Resistance Charm Liquid Dye x1 | Azure Dragon Gallbladder x4 Divine Talisman Water x2 | Azure Dragon Gallbladder x4 Ultimate Talisman Water | Azure Dragon Gallbladder x4 | Azure Dragon Gall x2 | Azure Dragon Gall Military Funds 300 |
دليل الحل
تبدو الخريطة معقدة للغاية، أليس كذلك؟ في الواقع، تعتبر هذه المهمة مميزة جدًا مقارنة بالمهام الأخرى، حيث تتميز بميزتين مميزتين:
أولاً، هناك ممرات مخفية في المناطق الفارغة من الخريطة، والتي حددتها بمربعات منقطة. مداخل ومخارج هذه الممرات مرقمة 1،2،3،4،7،8. أدعو المنطقتين داخل الكتل المنقطة جنوب الغابة وشمال الغابة. لاحظ أن الخريطة المصغرة لا تعمل في هاتين المنطقتين.
ثانيًا، المهمة لها فروع، مقسمة إلى فرعين رئيسيين: طريق قطاع الطرق وطريق قطاع الطرق.
ينقسم طريق قطاع الطرق أيضًا إلى طريق Kill Bandit الفرعي A ومسار Kill Bandit Captain الفرعي B.
ينقسم طريق قطاع الطرق إلى الطريق A لقتل قطاع الطرق والطريق B لقتل قادة قطاع الطرق.
وهذا يعني أن هناك 4 طرق مختلفة تمامًا تقريبًا لإكمال المهمة، والفرعان الرئيسيان لهما متطلبات مختلفة لتقييم الرتبة S.
هل تشعر بالدوار قليلاً؟ في الواقع هذا المسعى بسيط للغاية. بعد ذلك، سأقدم لك جميع أساليب الإستراتيجية الأربعة من الفئتين الرئيسيتين.
إذا كانت هذه هي المرة الأولى التي تقوم فيها بهذه المهمة، فستشعر بالتأكيد بعدم الارتياح - فالخريطة المصغرة عديمة الفائدة تمامًا في منطقة الغابات الكثيفة.
أولا، بعد بدء المهمة، اقتل اللصوص أولا. هذه الخطوة إلزامية. ثم تظهر الخريطة مواقع 4 أشخاص مشبوهين وهم الـ 4 طرق.
أولاً، دعونا نلقي نظرة على المسار الفرعي أ: اقتل قاطع الطريق
قاطع الطريق قريب من المدخل رقم 1. لاحظ أن هجومه مرتفع جدًا ولديه درع خارق. بعد هزيمته، يختفي الأشخاص الثلاثة المشبوهون الآخرون، وتدخل أنت رسميًا الطريق الفرعي A
بعد هزيمة قطاع الطرق، يختبئ. للعثور عليه، مر عبر المدخلين 3 و5 للوصول إلى الغابة الشمالية. عند الوصول إلى الغابة الشمالية، تظهر كمائن العدو في المنطقة الخضراء الموضحة. اقتلهم جميعًا دون فقدان أي منهم، إجمالي 60. لا تلمس الأعداء الحمر، ليس لديهم أي علاقة بالطريق الفرعي A، قتلهم هو مضيعة للوقت. يرجى توخي الحذر الشديد عند القتل هنا، لأن الخريطة المصغرة عديمة الفائدة وتحتاج إلى استخدام عينيك لملاحظة ما إذا تم تفويت أي منها. نصفهم من الرماة، لذلك يتطلب قتلهم الكثير من الجهد.
وبالمثل، يمكن أيضًا إكمال خطوة تطهير العدو هذه بقتل فتيان القرع فقط!
بعد قتلهم، يطالبك النظام باحتلال القاعدة A. طريقة الاحتلال هي هزيمة قائد الفرقة.
بعد الاحتلال، تم اكتشاف مبخرة البخور الخالدة غير موجودة في هذه القاعدة، ويظهر قاطع الطريق الذي كان مختبئًا في وقت سابق في الغابة الشمالية الكثيفة. مر عبر المدخل 7 أو 8 لهزيمته.
بعد التطهير، انتقل إلى موقع X الأزرق على الخريطة وتنتهي المهمة.
مداخل الغابة مخفية جدًا، لا تفوتها.
بعد ذلك، دعونا نلقي نظرة على المسار الفرعي B: اقتل قائد قطاع الطرق
بعد هزيمة قطاع الطرق، تجاهل قطاع الطرق بالقرب من المدخل 1، انتقل إلى المدخل القريب 2 واقتل قائد قطاع الطرق، وقم أيضًا بالقضاء على جميع الأعداء القريبين.
ثم يطالبك النظام بالذهاب إلى North Forest. عند المرور عبر المدخل رقم 5، يظهر أعداء في كمين. مثل الطريق A، قم بالقضاء عليهم جميعًا دون ترك أي ناجين.
ثم يطالبك النظام بالذهاب إلى القاعدة A، لكن لا تشغلها فعليًا. هذا يختلف عن المسار الفرعي A، تذكر هذا. عند الاقتراب من القاعدة A، يظهر القائد في الموضع ①. مر عبر المدخل 4 أو 3 لقتله. لاحظ أن القائد يتمتع بجسم فولاذي وقوة هجومية عالية جدًا.
القائد الذي يظهر عند ① مزيف. إذا كان الوقت المتبقي أقل من 11 دقيقة بعد هزيمته، فستنتهي المهمة على الفور. إذا بقي أكثر من 11 دقيقة، فسيظهر القائد الحقيقي في الموقع ②. هزيمة القائد الحقيقي وتنتهي المهمة.
بعد ذلك، دعونا نلقي نظرة على المسار الفرعي أ: اقتل قطاع الطرق
وبالمثل، اقتل اللص أولاً، ثم اقترب بالقرب من المدخل رقم 4 واقتل قطاع الطرق هناك.
ثم يطلب منك النظام التقاط القاعدة B. طريقة الالتقاط هي هدم البرج.
بعد تدميرها، انتقل عبر المدخل رقم 5 إلى الغابة الشمالية الكثيفة. سوف تظهر قوات الكمين مباشرة بعد الدخول. ملاحظة: يرجى القضاء على جميع الأعداء في المنطقتين الأحمرتين داخل الغابة الموضحتين في الصورة. الأعداء الأصفر لا أهمية لهم.
بعد قتلهم، يطلب النظام الذهاب إلى مخزن حبوب العدو. قم بالمرور عبر المدخل 8 للوصول إلى مخزن الحبوب، وفجأة تظهر مجموعة كبيرة من الأعداء في منتصف الطريق، يبلغ مجموعها 160، بما في ذلك 20 من رماة السهام.
اقتلهم جميعًا، اكتملت المهمة.
أخيرًا، دعونا نلقي نظرة على فرع الطريق ب: اهزم قائد فرقة اللصوص
بعد قتل اللص، قم بالمرور عبر المدخل رقم 3 لقتل قائد قطاع الطرق هناك. يجب عليك أيضًا القضاء على جميع الأعداء المحيطين بك، وعددهم الإجمالي 30، بما في ذلك 20 من رماة السهام.
بعد هزيمتهم، يطالبك النظام بالذهاب إلى North Forest. عند المرور عبر المدخل رقم 5، تظهر كمائن للعدو. مثل الطريق الفرعي أ، قم بإزالتهم.
بعد ذلك، تتطلب المهمة منك الذهاب إلى مخزن حبوب العدو، والمرور عبر المدخل رقم 8، وفي منتصف الطريق تظهر مجموعة كبيرة أخرى من الأعداء، ولكن هذه المرة يوجد ضابطان، وانغ هواي وتشانغ دانغ على التوالي. ومع ذلك، هذا لا يهم كثيرا. بعد هزيمة هذين، تنتهي المهمة. لاحظ أن كلاهما يتمتعان بدروع فائقة وقوة هجومية عالية جدًا.
ملاحظات إنجاز الرتبة S
كما ذكرت في البداية، تحتوي هذه المهمة على طريقين رئيسيين مع إجمالي 4 مسارات فرعية. وهذا يعني 4 نهايات مختلفة. متطلبات الحصول على المرتبة S على هذين الطريقين الرئيسيين مختلفة تمامًا. من بينها، يتطلب طريق قطاع الطرق إكمال المهمة مع الوقت المتبقي البالغ 10 دقائق و07 ثوانٍ أو أكثر. يتطلب طريق قطاع الطرق إكمال المهمة بعدد 1200+ KO.
المسار الذي تختاره هو حريتك. يتطلب الطريق B هزيمة القائد الحقيقي للحصول على رتبة S. إذا قتلت القائد المزيف، تنتهي المهمة، حتى لو كان لا يزال هناك أكثر من 10 دقائق متبقية، فلا يزال بإمكانك الحصول على رتبة A فقط.
أخيرًا، هناك شيء آخر يجب ملاحظته: عند المرور عبر المدخل 5، في بعض الأحيان قد لا تظهر قوات الكمين. أقترح أن يقف الجميع عند المدخل رقم 5 لمدة 1-2 ثانية. لن تحدث هذه المشكلة كثيرًا بعد ذلك. أنا شخصيا أشعر أن هذا خطأ صغير في السعي.
รางวัลตามระดับ
| อันดับ S | อันดับ | อันดับบี | อันดับซี | อันดับ D | อันดับ E |
|---|
| Quest Rewards | Divine Talisman Water x2 Jade Cutter x2 Cold Resistance Charm Liquid Dye x1 | Azure Dragon Gallbladder x4 Divine Talisman Water x2 | Azure Dragon Gallbladder x4 Ultimate Talisman Water | Azure Dragon Gallbladder x4 | Azure Dragon Gall x2 | Azure Dragon Gall Military Funds 300 |
วิธีเล่นผ่าน
แผนที่ดูซับซ้อนมากใช่ไหม? จริงๆ แล้ว ภารกิจนี้ค่อนข้างพิเศษเมื่อเทียบกับภารกิจอื่นๆ โดยมีคุณสมบัติที่โดดเด่นที่สุดสองประการ:
ประการแรก มีข้อความที่ซ่อนอยู่ในพื้นที่ว่างของแผนที่ ซึ่งฉันได้ทำเครื่องหมายไว้ด้วยบล็อกจุด ทางเข้าออกของข้อความเหล่านี้มีหมายเลข 1,2,3,4...7,8 ฉันเรียกทั้งสองพื้นที่ภายในบล็อกประ South Forest และ North Forest โปรดทราบว่าใน 2 พื้นที่นี้ แผนที่ย่อจะไม่ทำงาน
ประการที่สอง ภารกิจมีสาขาแบ่งออกเป็น 2 สาขาหลัก ได้แก่ เส้นทาง Bandit และเส้นทาง Brigand
เส้นทางโจรยังแบ่งออกเป็นเส้นทางย่อย Kill Bandit A และเส้นทางย่อย Kill Bandit Captain B
เส้นทางโจรแบ่งออกเป็นเส้นทาง A สำหรับฆ่าโจร และเส้นทาง B สำหรับฆ่าหัวหน้าโจร
กล่าวคือ มี 4 วิธีที่แตกต่างกันอย่างสิ้นเชิงในการทำภารกิจให้สำเร็จ และ 2 สาขาหลักมีข้อกำหนดที่แตกต่างกันสำหรับการประเมินอันดับ S
คุณรู้สึกเวียนหัวนิดหน่อยหรือเปล่า? จริงๆแล้วภารกิจนี้ค่อนข้างง่าย ต่อไป ฉันจะแนะนำคุณให้รู้จักกับวิธีกลยุทธ์ทั้ง 4 วิธีจาก 2 หมวดหมู่หลัก
หากนี่เป็นครั้งแรกที่คุณทำภารกิจนี้ คุณจะรู้สึกไม่สบายใจอย่างแน่นอน - แผนที่ขนาดเล็กไม่มีประโยชน์เลยในพื้นที่ป่าทึบ
ขั้นแรก หลังจากภารกิจเริ่มต้นขึ้น ให้ฆ่าโจรก่อน ขั้นตอนนี้เป็นข้อบังคับ จากนั้นแผนที่จะแสดงตำแหน่งของบุคคลต้องสงสัย 4 ราย ซึ่งเป็น 4 เส้นทาง
ก่อนอื่น มาดูเส้นทางย่อย A: Kill Bandit กันก่อน
โจรอยู่ใกล้ทางเข้า 1 โปรดทราบว่าการโจมตีของเขาสูงมากและเขามีเกราะพิเศษ หลังจากเอาชนะเขาแล้ว ผู้ต้องสงสัยอีก 3 คนก็หายไป และคุณเข้าสู่เส้นทางย่อย A อย่างเป็นทางการ
หลังจากที่คุณเอาชนะโจรแล้วเขาจะซ่อนตัว หากต้องการค้นหาเขา ให้ผ่านทางเข้า 3 และ 5 เพื่อไปยัง North Forest เมื่อมาถึง North Forest การซุ่มโจมตีของศัตรูจะปรากฏขึ้นในพื้นที่สีเขียวที่แสดง ฆ่าพวกมันทั้งหมดโดยไม่พลาดเลย รวม 60 ตัว อย่าแตะต้องศัตรูสีแดง พวกมันไม่เกี่ยวอะไรกับเส้นทางย่อย A การฆ่าพวกมันเป็นการเสียเวลา โปรดใช้ความระมัดระวังเป็นอย่างยิ่งในการสังหารที่นี่ เนื่องจากแผนที่ขนาดเล็กไม่มีประโยชน์ และคุณต้องใช้สายตาเพื่อดูว่ามีสิ่งใดพลาดไปหรือไม่ ครึ่งหนึ่งเป็นนักธนู ดังนั้นจึงต้องใช้ความพยายามอย่างมากในการฆ่าพวกเขา
ในทำนองเดียวกัน ขั้นตอนการเคลียร์ศัตรูนี้ก็สามารถทำได้โดยการฆ่าเด็กน้ำเต้าเท่านั้น!
หลังจากสังหารพวกมันแล้ว ระบบจะแจ้งให้คุณยึดครองฐาน A วิธีการยึดครองคือSquad Leader Defeat
หลังจากยึดครองแล้ว พบว่ากระถางธูปอมตะไม่ได้อยู่ในฐานนี้ และโจรที่ซ่อนตัวอยู่ก่อนหน้านี้ก็ปรากฏตัวขึ้นในป่าทึบทางตอนเหนือ ผ่านทางเข้า 7 หรือ 8 เพื่อเอาชนะเขา
หลังจากเคลียร์แล้ว ให้ไปที่ตำแหน่ง X สีน้ำเงินบนแผนที่และภารกิจจะสิ้นสุดลง
ทางเข้าป่าถูกซ่อนไว้มากอย่าพลาด
ต่อไปเรามาดูเส้นทางย่อย B: Kill Bandit Captain
หลังจากเอาชนะโจรแล้ว ให้เพิกเฉยต่อโจรที่อยู่ใกล้ทางเข้า 1 ไปที่ทางเข้าใกล้ทางเข้า 2 แล้วฆ่ากัปตันโจร และกำจัดศัตรูที่อยู่ใกล้เคียงทั้งหมด
จากนั้นระบบจะแจ้งให้คุณไปที่ป่าทางเหนือ เมื่อผ่านทางเข้าหมายเลข 5 ศัตรูที่ซุ่มโจมตีจะปรากฏขึ้น เช่นเดียวกับเส้นทาง A กำจัดพวกมันทั้งหมดโดยไม่เหลือผู้รอดชีวิตเลย
จากนั้นระบบจะแจ้งให้ไปที่ฐาน A แต่ไม่ได้ครอบครองจริง ซึ่งแตกต่างจากเส้นทางย่อย A จำไว้ เมื่อเข้าใกล้ฐาน A ผู้นำจะปรากฏที่ตำแหน่ง 1 ผ่านทางเข้า 4 หรือ 3 เพื่อฆ่าเขา โปรดทราบว่าผู้นำมีร่างกายที่เป็นเหล็กและมีพลังโจมตีสูงมาก
ผู้นำที่ปรากฏที่ 1 เป็นของปลอมหากเวลาที่เหลือหลังจากเอาชนะพวกเขาได้น้อยกว่า 11 นาที ภารกิจจะสิ้นสุดทันที หากเหลือเวลาเกิน 11 นาที ผู้นำที่แท้จริงจะปรากฏที่ตำแหน่ง 2 เอาชนะผู้นำที่แท้จริงและภารกิจจะสิ้นสุดลง
ต่อไป มาดูเส้นทางย่อย a: Kill Bandits
ในทำนองเดียวกัน ก่อนอื่นให้ฆ่าขโมย จากนั้นเข้าไปใกล้ทางเข้า 4 แล้วฆ่าพวกโจรที่นั่น
จากนั้นระบบต้องการให้คุณยึดฐาน B วิธีการยึดคือTower Demolition
หลังจากทำลายมันแล้ว ให้ผ่านทางเข้า 5 ไปยังป่าทึบทางตอนเหนือ กองทหารซุ่มโจมตีจะปรากฏขึ้นทันทีหลังจากเข้าไป หมายเหตุ: โปรดกำจัดศัตรูทั้งหมดในพื้นที่สีแดง 2 แห่งภายในป่าที่แสดงในภาพ ศัตรูสีเหลืองนั้นไม่เกี่ยวข้อง
หลังจากสังหารพวกเขาแล้ว ระบบจะแจ้งให้ไปที่ยุ้งฉางของศัตรู ผ่านทางเข้าหมายเลข 8 เพื่อไปยังยุ้งฉาง และทันใดนั้น ศัตรูกลุ่มใหญ่ก็ปรากฏตัวขึ้นครึ่งทาง รวมทั้งหมด 160 ตัว รวมทั้งนักธนู 20 คน
ฆ่าพวกมันทั้งหมด ภารกิจเสร็จสิ้น
สุดท้าย มาดูสาขาเส้นทาง b: เอาชนะหัวหน้าหน่วยโจร
หลังจากฆ่าโจรแล้ว ให้ผ่านทางเข้า 3 เพื่อฆ่าหัวหน้าโจรที่นั่น คุณต้องกำจัดศัตรูโดยรอบทั้งหมด รวม 30 ตัว รวมทั้งนักธนู 20 คน
หลังจากเอาชนะพวกมันได้แล้ว ระบบจะแจ้งให้คุณไปที่ป่าทางเหนือ เมื่อผ่านทางเข้าหมายเลข 5 การซุ่มโจมตีของศัตรูจะปรากฏขึ้น เช่นเดียวกับเส้นทางย่อย a กำจัดพวกมัน
ต่อไปภารกิจกำหนดให้คุณต้องไปที่ยุ้งฉางของศัตรู ผ่านทางเข้า 8 และศัตรูกลุ่มใหญ่อีกครึ่งทางปรากฏขึ้น แต่คราวนี้มีเจ้าหน้าที่ 2 คน คือ Wang Huai และ Zhang Dang ตามลำดับ อย่างไรก็ตาม สิ่งนี้ไม่สำคัญมากนัก หลังจากเอาชนะ 2 คนนี้ได้แล้ว ภารกิจก็สิ้นสุดลง โปรดทราบว่าทั้งคู่มีเกราะชั้นยอดและพลังโจมตีที่สูงมาก
บันทึกความสำเร็จระดับ S
อย่างที่ผมบอกไปแล้วตอนต้น ภารกิจนี้มีสองเส้นทางหลัก รวมทั้งหมด 4 เส้นทางย่อย นั่นหมายถึงตอนจบที่แตกต่างกัน 4 แบบ ข้อกำหนดในการได้รับอันดับ S ในสองเส้นทางหลักนี้แตกต่างกันอย่างสิ้นเชิง ในบรรดาเส้นทางเหล่านั้น เส้นทางโจรกำหนดให้คุณต้องทำภารกิจให้สำเร็จโดยมีเวลาเหลือ 10 นาที 07 วินาทีขึ้นไป เส้นทางโจรต้องสำเร็จภารกิจโดยนับ 1200+ KO
เส้นทางที่คุณเลือกคืออิสรภาพของคุณ เส้นทาง B ต้องเอาชนะผู้นำที่แท้จริงเพื่อให้ได้อันดับ S หากคุณฆ่าผู้นำปลอม ภารกิจจะสิ้นสุดลง แม้ว่าจะเหลือเวลาเหลือมากกว่า 10 นาที คุณยังคงได้รับเพียงอันดับ A
สุดท้ายนี้ อีกสิ่งหนึ่งที่ควรทราบ: เมื่อผ่านทางเข้าหมายเลข 5 บางครั้งกองทหารซุ่มโจมตีอาจไม่เกิด ฉันแนะนำให้ทุกคนยืนที่ทางเข้า 5 เป็นเวลา 1-2 วินาที ปัญหานี้คงไม่เกิดขึ้นมากแล้ว โดยส่วนตัวแล้วฉันรู้สึกว่านี่เป็นจุดบกพร่องเล็กๆ ในภารกิจ