Rewards by Rank
| S Rank | A Rank | B Rank | C Rank | D Rank | E Rank |
|---|
| Quest Rewards | Blessed Water x5 Crimson Suzaku Wing x2 | Blessed Water x4 Supreme Vermillion Bird Wing | Talisman Water x3 | Talisman Water Military Funds 250 | Talisman Water Military Funds 100 | Military Funds 450 |
Walkthrough
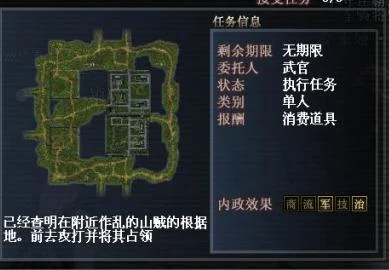
The quest is very simple, after capturing all bases, it ends. All bases are captured byCaptain Defeated.
S Rank Achievement Precautions
Getting S rank for this quest is not so simple. First, the quest only has 15 minutes, wanting to capture 5 bases that are so far apart within 5 minutes is quite a test of your skills and equipment strength.
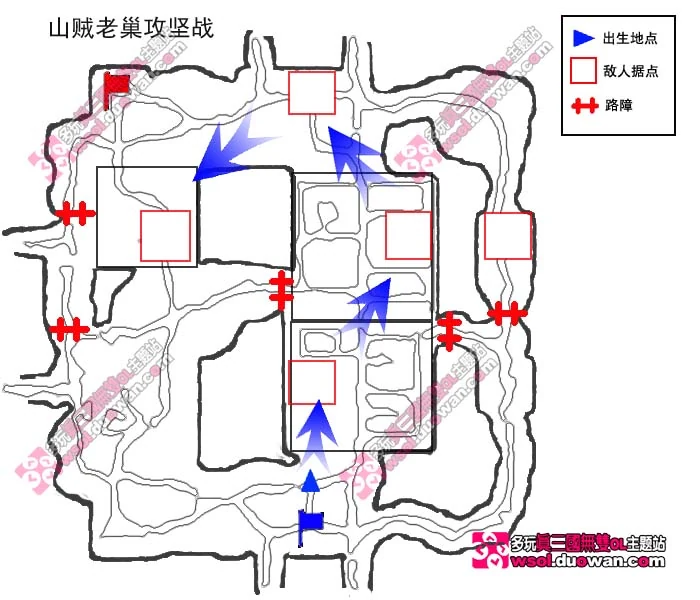
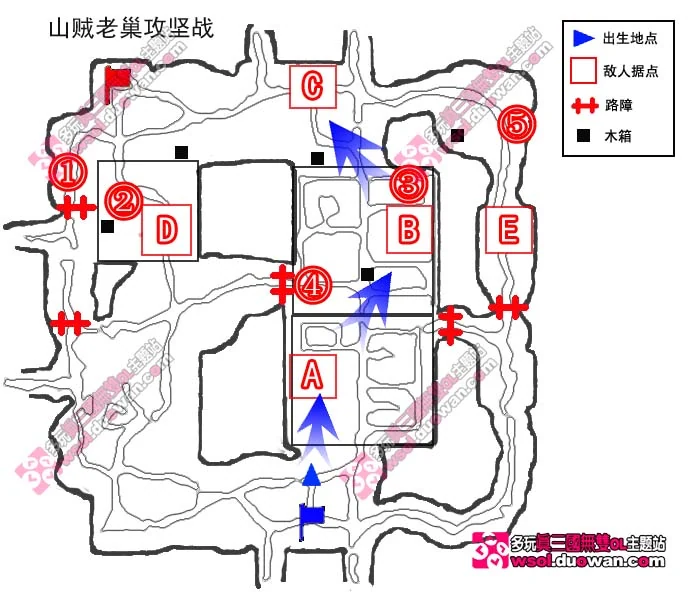
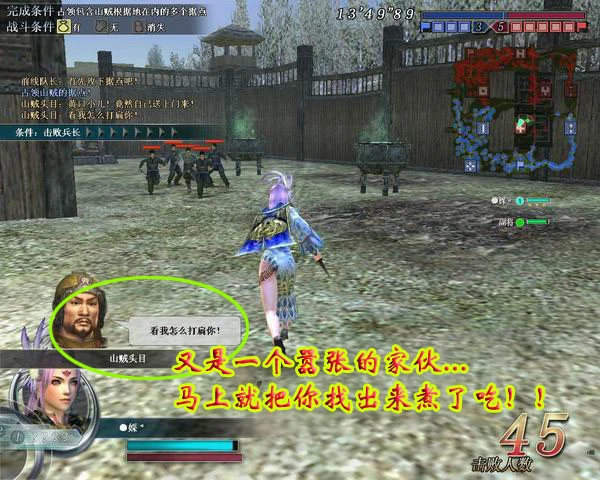
After the quest starts, naturally rush to capture Base A at the fastest speed. Whether to enhance weapons is your choice. There are 45 enemy soldiers around the base, including 5 archers. And their positions are very scattered.
After capturing Base A, immediately rush to Base B, separated by a city wall in between, go up the stairs on the right, then jump down the wall.
I've marked all the wooden box locations. If you're not confident in your weapon, you can go slash one for full Musou. In any case, occupy Base B at maximum speed.
Base B occupation complete. The bandit leader has fled to Base C. Without question, rush over and capture it.
After capturing Base C, the quest branches. There are the followingTwo typessituation.
1. Bandit leader flees to Base D
2. Bandit leader flees to a certain point on the map
For dealing with the first situation, there's nothing much to say. Continue to occupy Base D. After occupying it, go and capture Base E. Quest complete. It sounds easy, but time is really tight.
The second situation is troublesome. And from my entire day of doing this, the second situation occurs over 90% of the time.
After the bandit leader escapes, he will hide at a fixed location somewhere on the map.However, the system will not prompt you, you must find it yourself. Truly befitting of bandits, they love doing these sneaky things.
I have marked the possible hideout locations of the leader with numbers on the map. But with so many locations, if you confirm them one by one, S rank would be long gone... How can you confirm the leader's location immediately?
I tried many methods, unfortunately, the spawn location is completely random with no pattern. Now there's only one method left. That is——Visual estimation
That's right,Use your eyes to look at the map. Find the newly spawned point among the numerous red dots after the leader's escape, and that point is where the leader is located!
A very eye-straining task. If you feel your screen resolution is large enough and you have enough confidence in your eyesight, then continue reading.
Based on my summary, among these 5 hiding spotsPoints ③④ are easiest to distinguish, while other locations require some eyesight to find. Let me explain each one separately.
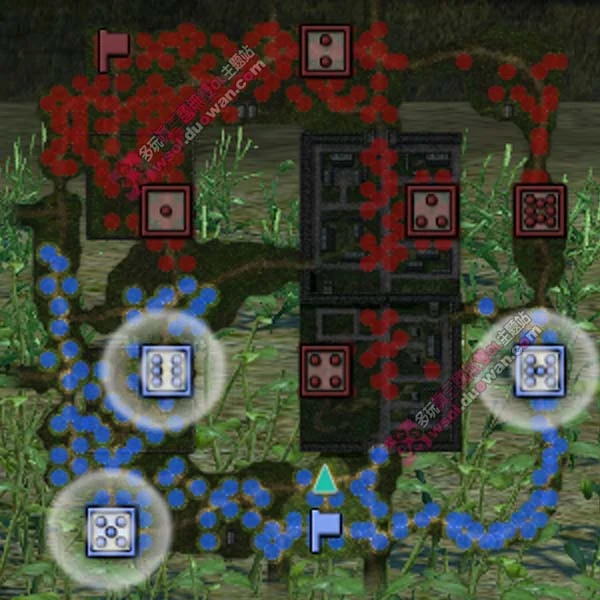
First, here'sMap before the leader's escape.
Everyone please carefully memorize the distribution of each red dot on this map...
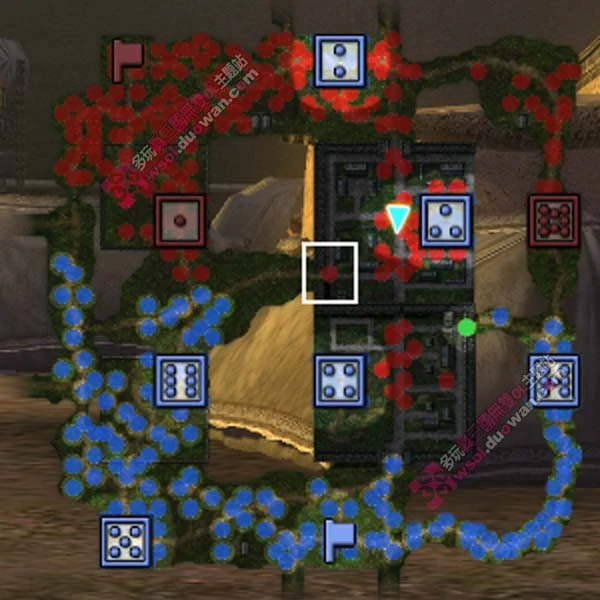
This is point ④, very easy to identify because there are no enemy soldiers around. If it spawns at this point, I believe you can find it without any effort.
This is point ③, compared to point ④ it's not easy to notice, but since there are no other red dots around to interfere, it's still easy to find.
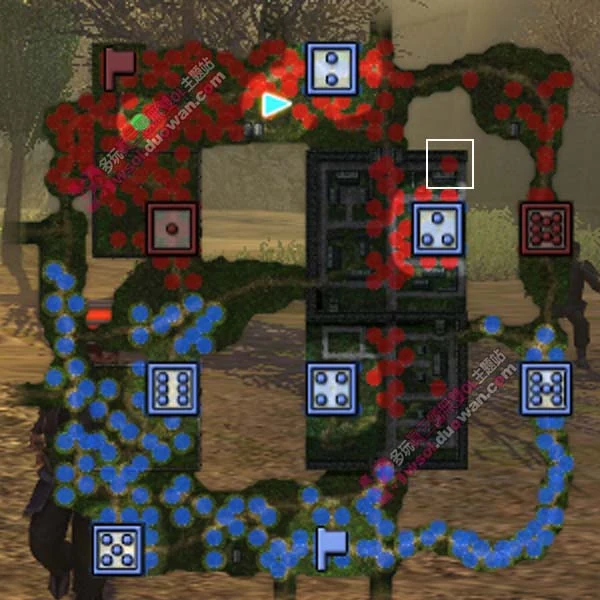
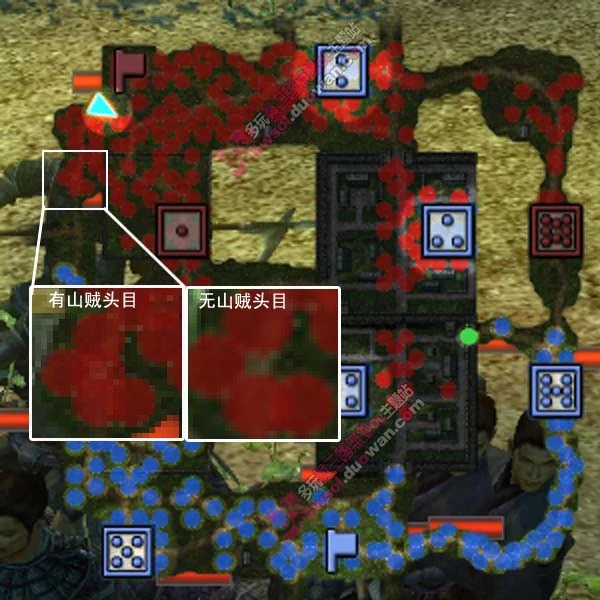
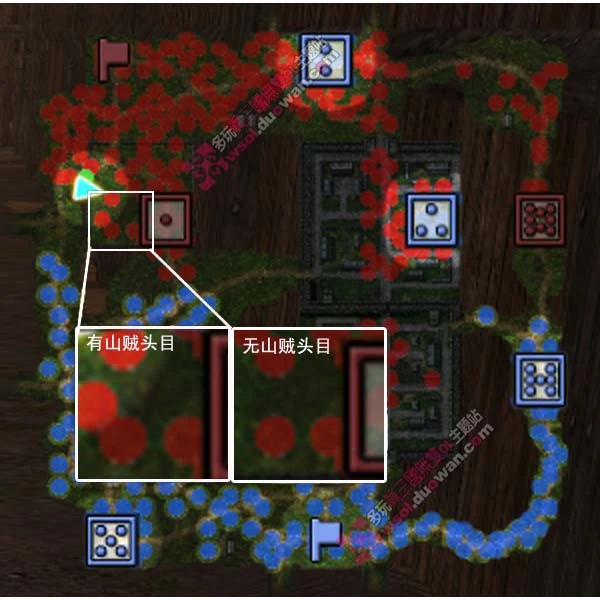
Besides the above 2 points, the remaining 3 locations require you to open your eyes wide! As shown, this is point ①. The leader almost overlaps with the 4 enemy soldier dots nearby. It's hard to notice without careful observation. However, after zooming in, you can still see there's an extra red dot in the middle.
This is point ②, due to interference from other enemy soldiers, it's still hard to notice without careful observation. However, this extra point is still relatively obvious.
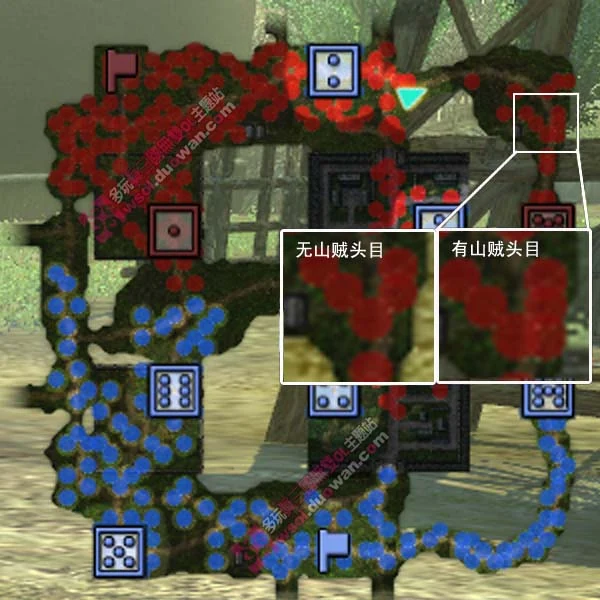
Point ⑤ is mixed together with a group of enemy soldiers. Fortunately, this extra point is still relatively prominent. If you notice the red area here is slightly larger, then the leader is most likely hiding here.
The above are the comparison images of the 5 hiding spots.Considering points ③④ are easier to find, after occupying Base C, if the leader escape event occurs, please check these 2 locations first, if not, check the other three points that are harder to notice. I believe as long as you keep your eyes open, this little scoundrel cannot escape your sharp gaze!
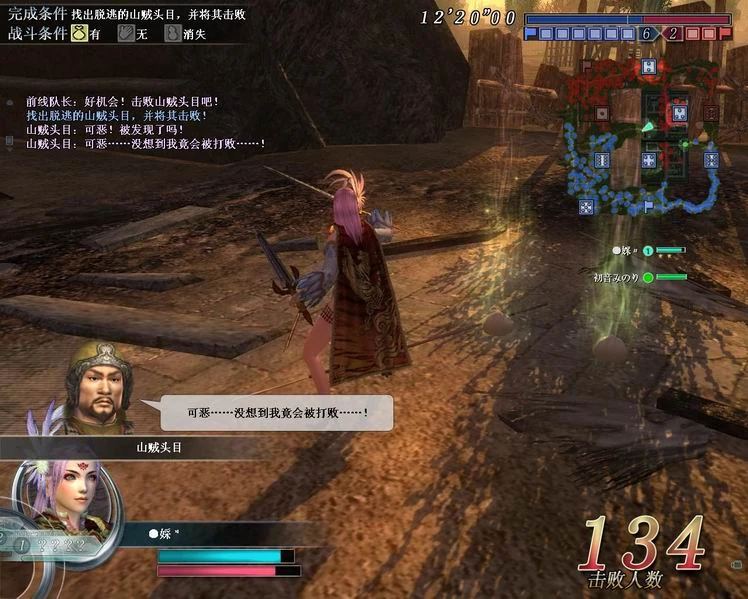
The bandit leader's strength is very ordinary. He can be defeated quite easily. After defeating him, the quest ends, and with over 10 minutes remaining you get S Rank evaluation.
To put it simply, this quest is the same type as Phantom Wine - it tests your eyesight!
評価別報酬
| Sランク | Aランク | Bランク | Cランク | Dランク | Eランク |
|---|
| Quest Rewards | Blessed Water x5 Crimson Suzaku Wing x2 | Blessed Water x4 Supreme Vermillion Bird Wing | Talisman Water x3 | Talisman Water Military Funds 250 | Talisman Water Military Funds 100 | Military Funds 450 |
攻略手順
クエストは非常にシンプルで、すべての拠点を占領したら終了です。すべての基地はキャプテン・デフィーテッドによって占領されます。
Sランク達成時の注意事項
このクエストでSランクを獲得するのはそう簡単ではありません。まず、このクエストの時間は 15 分しかなく、5 分以内に遠く離れた 5 つの拠点を占領するのは、かなりのスキルと装備の強さを試されます。
クエスト開始後は当然ながら最速で拠点Aの攻略を目指します。武器を強化するかどうかはあなたの選択です。基地の周囲には射手5名を含む45名の敵兵がいる。そして彼らの立場は非常にバラバラです。
拠点Aを占領したら、すぐに城壁を隔てた拠点Bに急行し、右側の階段を上り、壁を飛び降ります。
木箱の位置をすべてマークしました。武器に自信がない場合は、完全な無双のために 1 つを斬りに行くこともできます。とにかく最高速度で拠点Bを占領しましょう。
拠点B占領完了。盗賊のリーダーは拠点 C に逃げました。迷わず急いで捕まえてください。
拠点Cを占領するとクエストが分岐します。状況としては以下の2種類があります。
1. 盗賊のリーダーがD基地に逃亡
2. 山賊のリーダーはマップ上の特定の地点に逃げます
最初の状況への対処については、特に言うことはありません。引き続き拠点 D を占領します。占領後、拠点 E を占領します。クエスト完了です。簡単そうに聞こえますが、時間は本当に厳しいです。
2番目の状況は厄介です。そして、これを一日中やっていると、90% 以上の確率で 2 番目の状況が発生します。
山賊のリーダーが逃げた後、彼はマップ上のどこかの固定位置に隠れます。ただし、システムはプロンプトを表示しないため、自分で見つける必要があります。まさに山賊らしく、彼らはこうした卑劣な行為が大好きです。
リーダーの隠れ家候補の場所を地図上に番号でマークしました。でも、拠点が多いので一つ一つ確認していたらSランクは遠くなってしまいます… リーダーの居場所をすぐに確認するにはどうすればいいですか?
多くの方法を試してみましたが、残念ながらスポーン位置はパターンがなく完全にランダムでした。さて、残された方法は一つだけです。それは――目視推定
そう、地図を見て目を使ってください。リーダーが逃げた後、多数の赤い点の中から新しく出現したポイントを見つけてください。そのポイントがリーダーのいる場所です。
非常に目を疲れさせる作業です。画面の解像度が十分に大きく、視力に十分な自信がある場合は、読み続けてください。
私のまとめでは、この5つの隠れスポットのうち、③④が一番分かりやすいですが、その他の場所はある程度の視力が必要です。それぞれについて個別に説明しましょう。
まずはリーダー逃亡前のマップです。
皆さんもこの地図上の赤い点の分布をよく覚えておいてください…。
ここがポイント④ですが、周りに敵兵がいないので非常に分かりやすいです。この時点でスポーンすれば、苦労せずに見つかると思います。
こちらはポイント③で、ポイント④に比べると目立ちにくいですが、周りに邪魔な赤い点がないので、それでも見つけやすいです。
上記2点以外の残り3箇所は目を大きく開ける必要があります!ご覧の通り、ポイント①です。リーダーは近くの4つの敵兵ドットとほぼ重なっています。よく観察しないと気づきにくいです。ただし、拡大すると、中央に余分な赤い点があることがわかります。
これは②ですが、他の敵兵の妨害もあって、やはり注意して観察していないと気づきにくいです。ただし、この追加点はまだ比較的明らかです。
ポイント⑤は敵兵の集団に混じる。幸いなことに、この追加点は依然として比較的顕著です。ここの赤い領域がわずかに大きいことに気付いた場合は、リーダーがここに隠れている可能性があります。
上記は5つの隠れ場所の比較画像です。③④の地点が見つけやすいことを考慮して、拠点C占領後、リーダー脱出イベントが発生した場合はまずこの2箇所を確認し、発生しない場合は残りの気づきにくい3箇所を確認してください。あなたが目を開いている限り、この小さな悪党はあなたの鋭い視線から逃れることはできないと私は信じています!
山賊長の強さは至って普通。彼は非常に簡単に倒すことができます。倒すとクエスト終了となり、残り10分以上でSランク評価を獲得。
簡単に言うと、このクエストは幻のワインと同じタイプで、視力が試されます。
各评级奖励
| S级 | A级 | B级 | C级 | D级 | E级 |
|---|
| Quest Rewards | Blessed Water x5 Crimson Suzaku Wing x2 | Blessed Water x4 Supreme Vermillion Bird Wing | Talisman Water x3 | Talisman Water Military Funds 250 | Talisman Water Military Funds 100 | Military Funds 450 |
攻略流程
任务很简单,占领所有基地后就结束了。所有基地均被队长击败占领。
S级成就注意事项
这个任务获得S级并不是那么简单。首先,任务只有15分钟,想要在5分钟内攻克5个相距如此远的基地,对你的技能和装备实力是相当考验的。
任务开始后,自然要以最快的速度赶去攻占A基地。是否强化武器是你的选择。基地周围有45名敌军士兵,其中包括5名弓箭手。而且他们的位置也很分散。
占领A基地后,立即冲向B基地,中间有城墙,从右边的楼梯上去,然后跳下城墙。
我已经标记了所有木箱的位置。如果你对自己的武器没有信心,你可以砍一刀以获得完整的无双。无论如何,以最快的速度占领B基地。
B基地占领完成。强盗头目已经逃到C基地了,毫无疑问,冲过去将其抓获。
占领 C 基地后,任务出现分支。有以下两种情况。
1.强盗头目逃往D基地
2.强盗头目逃往地图上的某个地点
对于第一种情况,没什么好说的。继续占领D基地,占领后去占领E基地,任务完成。听起来很简单,但时间确实很紧张。
第二种情况就麻烦了。从我一整天的工作来看,第二种情况90%以上都会发生。
土匪头子逃跑后,会隐藏在地图上某处的固定位置。不过系统不会提示你,你必须自己找到。他们真是土匪啊,就喜欢做这些鬼鬼祟祟的事情。
我已经在地图上用数字标记了首领可能的藏身处。但这么多地点,一一确认的话,S级早就没了……如何才能第一时间确认首领的位置呢?
我尝试了很多方法,不幸的是,生成位置完全是随机的,没有模式。现在只剩下一种方法了。那就是——目视估计
没错,用眼睛看地图。在首领逃跑后的众多红点中找到新生成的点,那个点就是首领所在的位置!
这是一项非常费眼睛的任务。如果您觉得自己的屏幕分辨率足够大,并且对自己的视力有足够的信心,那么请继续阅读。
根据我的总结,这5个隐藏点中,最容易辨别的是第③④点,而其他位置则需要一定的眼力才能找到。让我分别解释一下。
首先,这是领导者逃跑前的地图。
请大家仔细记住这张地图上每个红点的分布……
这是第四点,很容易识别,因为周围没有敌兵。如果它此时出现,我相信你可以毫不费力地找到它。
这是第三点,相对于第四点来说不太容易注意到,但由于周围没有其他红点干扰,所以还是很容易发现的。
除了以上2点,剩下的3个地点就需要你擦亮眼睛了!如图所示,这就是第①点。领导者几乎与附近的 4 个敌方士兵点重叠。如果不仔细观察是很难注意到的。然而放大后,你仍然可以看到中间多了一个红点。
这是第二点,由于有其他敌兵的干扰,不仔细观察还是很难注意到的。不过这个加分还是比较明显的。
点⑤与一群敌兵混杂在一起。好在这个加分还是比较突出的。如果你发现这里的红色区域稍大一些,那么领导者很可能就藏在这里。
以上是5个隐藏点的对比图。考虑到第③④点比较容易发现,占领C基地后,如果发生首领逃跑事件,请先检查这2个位置,如果没有,再检查其他三个较难注意到的点。我相信,只要你擦亮眼睛,这个小流氓就逃不过你锐利的目光!
山贼头子的实力很一般。他很容易被击败。击败他后,任务结束,还剩10分钟以上,获得S级评价。
简单来说,这个任务和幻酒是同一个类型——考验眼力!
各評級獎勵
| S級 | A級 | B級 | C級 | D級 | E級 |
|---|
| Quest Rewards | Blessed Water x5 Crimson Suzaku Wing x2 | Blessed Water x4 Supreme Vermillion Bird Wing | Talisman Water x3 | Talisman Water Military Funds 250 | Talisman Water Military Funds 100 | Military Funds 450 |
攻略流程
任務很簡單,佔領所有基地後就結束了。所有基地均被隊長擊敗佔領。
S級成就注意事項
這個任務要獲得S級並不是那麼簡單。首先,任務只有15分鐘,想要在5分鐘內攻克5個相距如此遠的基地,對你的技能和裝備實力是相當考驗的。
任務開始後,自然要以最快的速度趕去攻占A基地。是否強化武器是你的選擇。基地周圍有45名敵軍士兵,其中包括5名弓箭手。而且他們的位置也很分散。
佔領A基地後,立即衝向B基地,中間有城牆,從右邊的樓梯上去,然後跳下城牆。
我已經標記了所有木箱的位置。如果你對自己的武器沒有信心,你可以砍一刀以獲得完整的無雙。無論如何,以最快的速度佔領B基地。
B基地佔領完成。強盜頭目已經逃到C基地了,毫無疑問,衝過去將其抓獲。
佔領 C 基地後,任務出現分支。有以下兩種情況。
1.強盜頭目逃往D基地
2.強盜頭目逃往地圖上的某個地點
對於第一種情況,沒什麼好說的。繼續佔領D基地,佔領後去佔領E基地,任務完成。聽起來很簡單,但時間確實很緊張。
第二種情況就麻煩了。從我一整天的工作來看,第二種情況90%以上都會發生。
土匪頭子逃跑後,會隱藏在地圖上某處的固定位置。不過系統不會提示你,你必須自己去找。他們真是土匪啊,就喜歡做這些鬼鬼祟祟的事。
我已經在地圖上用數字標記了首領可能的藏身處。但這麼多地點,一一確認的話,S級早就沒了……如何才能第一時間確認首領的位置呢?
我嘗試了很多方法,不幸的是,生成位置完全是隨機的,沒有模式。現在只剩下一種方法了。那就是——目視估計
沒錯,用眼睛看地圖。在首領逃跑後的眾多紅點中找到新生成的點,那個點就是首領所在的位置!
這是一項非常費眼睛的任務。如果您覺得自己的螢幕解析度夠大,並且對自己的視力有足夠的信心,那麼請繼續閱讀。
根據我的總結,這5個隱藏點中,最容易辨別的是第③④點,而其他位置則需要一定的眼力才能找到。讓我分別解釋一下。
首先,這是領導者逃跑前的地圖。
請大家仔細記住這張地圖上每個紅點的分佈…
這是第四點,很容易識別,因為周圍沒有敵兵。如果它此時出現,我相信你可以毫不費力地找到它。
這是第三點,相對於第四點來說不太容易注意到,但由於周圍沒有其他紅點幹擾,所以還是很容易發現的。
除了以上2點,剩下的3個地點就需要你擦亮眼睛了!如圖所示,這就是第①點。領導者幾乎與附近的 4 個敵方士兵點重疊。如果不仔細觀察是很難注意到的。然而放大後,你仍然可以看到中間多了一個紅點。
這是第二點,由於有其他敵兵的干擾,不仔細觀察還是很難注意到的。不過這個加分還是比較明顯的。
點⑤與一群敵兵混雜在一起。好在這個加分還是比較突出的。如果你發現這裡的紅色區域稍微大一些,那麼領導者很可能就會藏在這裡。
以上是5個隱藏點的比較圖。考慮到第③④點比較容易發現,佔領C基地後,如果發生首領逃跑事件,請先檢查這2個位置,如果沒有,再檢查其他三個較難注意到的點。我相信,只要你擦亮眼睛,這個小流氓就逃不過你銳利的目光!
山賊頭子的實力很一般。他很容易被擊敗。擊敗他後,任務結束,還剩10分鐘以上,獲得S級評價。
簡單來說,這個任務和幻酒是同一個類型-考驗眼力!
المكافآت حسب الرتبة
| رتبة S | رتبة | الرتبة ب | الرتبة ج | الرتبة د | الرتبة E |
|---|
| Quest Rewards | Blessed Water x5 Crimson Suzaku Wing x2 | Blessed Water x4 Supreme Vermillion Bird Wing | Talisman Water x3 | Talisman Water Military Funds 250 | Talisman Water Military Funds 100 | Military Funds 450 |
دليل الحل
المهمة بسيطة للغاية، بعد الاستيلاء على جميع القواعد، تنتهي. يتم الاستيلاء على جميع القواعد من قبل الكابتن المهزوم.
احتياطات تحقيق الرتبة S
الحصول على رتبة S لهذه المهمة ليس بهذه البساطة. أولاً، تستغرق المهمة 15 دقيقة فقط، والرغبة في الاستيلاء على 5 قواعد متباعدة جدًا في غضون 5 دقائق يعد بمثابة اختبار لمهاراتك وقوة معداتك.
بعد بدء المهمة، اندفع بشكل طبيعي للاستيلاء على القاعدة A بأقصى سرعة. سواء لتعزيز الأسلحة هو اختيارك. هناك 45 جنديًا من جنود العدو حول القاعدة، من بينهم 5 رماة. ومواقفهم متناثرة جدا.
بعد الاستيلاء على القاعدة A، اندفع فورًا إلى القاعدة B، التي يفصلها سور المدينة بينهما، ثم اصعد الدرج على اليمين، ثم اقفز إلى أسفل الجدار.
لقد حددت جميع مواقع الصناديق الخشبية. إذا لم تكن واثقًا من سلاحك، فيمكنك قطعه للحصول على Musou كاملًا. على أية حال، قم باحتلال القاعدة B بأقصى سرعة.
اكتمل احتلال القاعدة B. لقد هرب زعيم قطاع الطرق إلى القاعدة C. دون أدنى شك، اندفع نحوها وقم بالقبض عليها.
بعد الاستيلاء على القاعدة C، تتفرع المهمة. هناك النوعان التاليانالوضع.
1. يهرب زعيم قطاع الطرق إلى القاعدة D
2. يهرب زعيم قطاع الطرق إلى نقطة معينة على الخريطة
بالنسبة للتعامل مع الحالة الأولى، ليس هناك الكثير مما يمكن قوله. استمر في احتلال القاعدة D. بعد احتلالها، اذهب والتقط القاعدة E. اكتملت المهمة. يبدو الأمر سهلا، ولكن الوقت ضيق حقا.
الوضع الثاني مزعج. ومن خلال يومي بأكمله الذي قمت فيه بهذا، يحدث الموقف الثاني في أكثر من 90% من الوقت.
بعد هروب زعيم قطاع الطرق، سوف يختبئ في مكان ثابت في مكان ما على الخريطة. ومع ذلك، لن يطالبك النظام، يجب عليك العثور عليه بنفسك. حقًا يليق بقطاع الطرق، فهم يحبون القيام بهذه الأشياء المخادعة.
لقد حددت مواقع المخبأ المحتملة للزعيم بالأرقام الموجودة على الخريطة. ولكن مع وجود العديد من المواقع، إذا قمت بتأكيدها واحدًا تلو الآخر، فستختفي رتبة S منذ فترة طويلة... كيف يمكنك تأكيد موقع القائد على الفور؟
لقد جربت العديد من الطرق، لكن لسوء الحظ، كان موقع النشر عشوائيًا تمامًا ولا يوجد به أي نمط. الآن لم يتبق سوى طريقة واحدة. هذا هو —— التقدير البصري
هذا صحيح، استخدم عينيك للنظر إلى الخريطة. ابحث عن النقطة التي تم إنشاؤها حديثًا بين النقاط الحمراء العديدة بعد هروب القائد، وهذه النقطة هي المكان الذي يقع فيه القائد!
مهمة مرهقة للغاية للعين. إذا كنت تشعر أن دقة شاشتك كبيرة بما يكفي ولديك ثقة كافية في بصرك، فتابع القراءة.
بناءً على ملخصي، من بين نقاط الاختباء الخمسة هذه، من الأسهل تمييز النقاط ③④، بينما تتطلب المواقع الأخرى بعض البصر للعثور عليها. اسمحوا لي أن أشرح كل واحد على حدة.
أولاً، إليك الخريطة قبل هروب القائد.
يرجى من الجميع حفظ توزيع كل نقطة حمراء على هذه الخريطة بعناية...
هذه هي النقطة ④، من السهل جدًا تحديدها لأنه لا يوجد جنود أعداء حولها. إذا ظهر في هذه المرحلة، أعتقد أنه يمكنك العثور عليه دون أي جهد.
هذه هي النقطة ③، مقارنة بالنقطة ④ ليس من السهل ملاحظتها، ولكن نظرًا لعدم وجود نقاط حمراء أخرى للتدخل، فلا يزال من السهل العثور عليها.
إلى جانب النقطتين المذكورتين أعلاه، تتطلب منك المواقع الثلاثة المتبقية أن تفتح عينيك على نطاق واسع! كما هو موضح، هذه هي النقطة ①. يكاد القائد أن يتداخل مع نقاط جنود العدو الأربعة القريبة. من الصعب أن نلاحظ دون مراقبة دقيقة. ومع ذلك، بعد التكبير، لا يزال بإمكانك رؤية وجود نقطة حمراء إضافية في المنتصف.
هذه هي النقطة رقم 2، بسبب تدخل جنود العدو الآخرين، لا يزال من الصعب ملاحظتها دون مراقبة دقيقة. ومع ذلك، فإن هذه النقطة الإضافية لا تزال واضحة نسبيا.
النقطة ⑤ مختلطة مع مجموعة من جنود العدو. ولحسن الحظ، لا تزال هذه النقطة الإضافية بارزة نسبيًا. إذا لاحظت أن المنطقة الحمراء هنا أكبر قليلاً، فمن المرجح أن القائد يختبئ هنا.
ما ورد أعلاه هو صور المقارنة لأماكن الاختباء الخمسة. مع الأخذ في الاعتبار أنه من الأسهل العثور على النقاط ③④، بعد احتلال القاعدة C، إذا حدث حدث هروب القائد، يرجى التحقق من هذين الموقعين أولاً، وإذا لم يكن الأمر كذلك، فتحقق من النقاط الثلاث الأخرى التي يصعب ملاحظتها. أعتقد أنه طالما أبقيت عينيك مفتوحتين، فلن يتمكن هذا الوغد الصغير من الهروب من نظرتك الحادة!
قوة زعيم قطاع الطرق عادية جدًا. يمكن هزيمته بسهولة تامة. بعد هزيمته، تنتهي المهمة، ومع بقاء أكثر من 10 دقائق، تحصل على تقييم برتبة S.
بكل بساطة، هذه المهمة هي من نفس نوع Phantom Wine - فهي تختبر بصرك!
รางวัลตามระดับ
| อันดับ S | อันดับ | อันดับบี | อันดับซี | อันดับ D | อันดับ E |
|---|
| Quest Rewards | Blessed Water x5 Crimson Suzaku Wing x2 | Blessed Water x4 Supreme Vermillion Bird Wing | Talisman Water x3 | Talisman Water Military Funds 250 | Talisman Water Military Funds 100 | Military Funds 450 |
วิธีเล่นผ่าน
ภารกิจนั้นง่ายมาก หลังจากยึดฐานทั้งหมดได้แล้ว มันก็จะจบลง ฐานทั้งหมดถูกยึดโดยกัปตันพ่ายแพ้
ข้อควรระวังในการบรรลุอันดับ S
การได้รับอันดับ S สำหรับภารกิจนี้ไม่ใช่เรื่องง่าย ประการแรก ภารกิจมีเวลาเพียง 15 นาที ต้องการยึด 5 ฐานที่อยู่ห่างกันมากภายใน 5 นาที ถือเป็นการทดสอบทักษะและความแข็งแกร่งของอุปกรณ์ของคุณ
หลังจากภารกิจเริ่มต้นขึ้น ให้รีบเร่งเพื่อยึดฐาน A ด้วยความเร็วที่เร็วที่สุด คุณจะเลือกเสริมอาวุธหรือไม่ มีทหารศัตรู 45 นายอยู่รอบๆ ฐาน รวมทั้งพลธนู 5 นาย และตำแหน่งของพวกเขากระจัดกระจายมาก
หลังจากยึดฐาน A แล้ว ให้รีบไปที่ฐาน B ทันทีโดยมีกำแพงเมืองกั้นระหว่างนั้น ขึ้นบันไดทางขวาแล้วกระโดดลงกำแพง
ฉันได้ทำเครื่องหมายตำแหน่งกล่องไม้ทั้งหมดแล้ว หากคุณไม่มั่นใจในอาวุธของคุณ คุณสามารถฟันหนึ่งอันเพื่อให้ Musou เต็มได้ ไม่ว่าในกรณีใด ให้ยึดฐาน B ด้วยความเร็วสูงสุด
อาชีพฐาน B เสร็จสมบูรณ์ หัวหน้าโจรหนีไปที่ฐาน C แล้ว รีบไปจับมันโดยไม่มีคำถาม
หลังจากยึดฐาน C แล้ว ภารกิจจะแตกแขนงออกไป มีดังต่อไปนี้สองประเภทสถานการณ์
1. หัวหน้าโจรหนีไปที่ฐาน D
2. หัวหน้าโจรหลบหนีไปยังจุดใดจุดหนึ่งบนแผนที่
สำหรับการรับมือกับสถานการณ์แรกนั้น ไม่มีอะไรจะพูดมากนัก ยึดครองฐาน D ต่อไป หลังจากยึดครองแล้ว ให้ไปยึดฐาน E ภารกิจเสร็จสิ้น ฟังดูง่าย แต่เวลานั้นแน่นจริงๆ
สถานการณ์ที่สองนั้นลำบาก และจากทั้งวันที่ฉันทำเช่นนี้ สถานการณ์ที่สองเกิดขึ้นมากกว่า 90% ของเวลาทั้งหมด
หลังจากที่หัวหน้าโจรหลบหนีออกไป เขาจะซ่อนตัวอยู่ในตำแหน่งที่แน่นอนบนแผนที่ อย่างไรก็ตาม ระบบจะไม่แจ้งให้คุณทราบ คุณต้องค้นหาด้วยตัวเอง เหมาะกับโจรจริงๆ พวกเขาชอบทำเรื่องลับๆ ล่อ ๆ เหล่านี้
ฉันได้ทำเครื่องหมายสถานที่ซ่อนที่เป็นไปได้ของผู้นำด้วยตัวเลขบนแผนที่แล้ว แต่ด้วยสถานที่มากมาย หากคุณยืนยันทีละแห่ง อันดับ S จะหายไปนานแล้ว... คุณจะยืนยันตำแหน่งของผู้นำทันทีได้อย่างไร?
ฉันลองมาหลายวิธีแล้ว แต่น่าเสียดายที่ตำแหน่งวางไข่นั้นสุ่มโดยสมบูรณ์โดยไม่มีรูปแบบ ตอนนี้เหลือเพียงวิธีเดียวเท่านั้น นั่นคือ——การประมาณค่าด้วยภาพ
ถูกต้องแล้ว ใช้สายตาในการดูแผนที่ ค้นหาจุดที่เกิดใหม่ท่ามกลางจุดสีแดงจำนวนมากหลังจากการหลบหนีของผู้นำ และจุดนั้นคือตำแหน่งของผู้นำ!
เป็นงานที่ต้องใช้สายตามาก หากคุณรู้สึกว่าความละเอียดหน้าจอของคุณใหญ่เพียงพอและคุณมีความมั่นใจในการมองเห็นเพียงพอ ให้อ่านต่อ
จากบทสรุปของฉัน ในบรรดาจุดซ่อนทั้ง 5 จุดเหล่านี้ จุด 3④ จะแยกแยะได้ง่ายที่สุด ในขณะที่สถานที่อื่นๆ ต้องใช้สายตาในการค้นหา ให้ฉันอธิบายแต่ละรายการแยกกัน
ก่อนอื่น นี่คือแผนที่ก่อนที่ผู้นำจะหลบหนี
ทุกคนโปรดจำการกระจายของจุดสีแดงแต่ละจุดบนแผนที่นี้ให้ถี่ถ้วน...
นี่คือจุดที่ ④ ซึ่งระบุได้ง่ายมากเนื่องจากไม่มีทหารศัตรูอยู่รอบๆ ถ้ามันเกิด ณ จุดนี้ ฉันเชื่อว่าคุณสามารถหามันได้โดยไม่ต้องใช้ความพยายามใดๆ
นี่คือจุดที่ 3 เมื่อเทียบกับจุด ④ สังเกตได้ไม่ง่ายนัก แต่เนื่องจากไม่มีจุดสีแดงอื่นๆ รอบๆ ที่จะรบกวน จึงยังหาได้ง่าย
นอกจาก 2 จุดข้างต้นแล้ว อีก 3 แห่งที่เหลือยังต้องเบิกตาให้กว้าง! ดังที่แสดงไว้ นี่คือจุดที่ 1 ผู้นำเกือบจะทับซ้อนกับจุดทหารศัตรู 4 จุดที่อยู่ใกล้เคียง สังเกตได้ยากหากปราศจากการสังเกตอย่างรอบคอบ อย่างไรก็ตาม หลังจากซูมเข้าแล้ว คุณจะยังคงเห็นว่ามีจุดสีแดงเพิ่มเติมอยู่ตรงกลาง
นี่คือจุดที่ 2 เนื่องจากการแทรกแซงจากทหารศัตรูคนอื่นๆ จึงยังสังเกตเห็นได้ยากหากไม่ได้สังเกตอย่างระมัดระวัง อย่างไรก็ตาม จุดพิเศษนี้ยังค่อนข้างชัดเจน
จุดที่ ⑤ ผสมกับกลุ่มทหารศัตรู โชคดีที่จุดพิเศษนี้ยังค่อนข้างโดดเด่น หากคุณสังเกตเห็นว่าพื้นที่สีแดงตรงนี้ใหญ่ขึ้นเล็กน้อย แสดงว่าผู้นำน่าจะซ่อนอยู่ที่นี่
ด้านบนนี้เป็นภาพเปรียบเทียบจุดซ่อนทั้ง 5 จุด เมื่อพิจารณาจุด 3④ จะพบได้ง่ายกว่า หลังจากยึดฐาน C แล้ว หากเกิดเหตุการณ์การหลบหนีของผู้นำ โปรดตรวจสอบ 2 ตำแหน่งนี้ก่อน ถ้าไม่ ให้ตรวจสอบอีก 3 จุดที่เหลือที่สังเกตได้ยากกว่า ฉันเชื่อว่าตราบใดที่คุณยังคงลืมตา คนวายร้ายตัวน้อยนี้ก็ไม่สามารถรอดพ้นจากการจ้องมองอันเฉียบคมของคุณได้!
ความเข้มแข็งของหัวหน้าโจรนั้นธรรมดามาก เขาสามารถพ่ายแพ้ได้อย่างง่ายดาย หลังจากเอาชนะเขาแล้ว ภารกิจจะสิ้นสุดลง และเมื่อเหลือเวลาอีก 10 นาที คุณจะได้รับการประเมินระดับ S
พูดง่ายๆ ก็คือ ภารกิจนี้เป็นภารกิจประเภทเดียวกับ Phantom Wine - ทดสอบสายตาของคุณ!